Landscape Care The Beginners Guide to Maintaining Your Yard

Maybe this is the first time that you have had to worry about landscape care because this is your first home, or perhaps this is the first time that you have decided to care for your yard yourself. Either way, this guide will help you get started on the right foot.

When we decide to beautify our property through landscaping, we also need to take on the responsibility of maintenance so that it remains aesthetically pleasing and healthy.

This task is easier said than done for landscaping experts and novice homeowners. The planting and construction is often the easy part. The maintenance is where we are really tested.

It takes a lot of commitment to care for your property. A beautiful landscape is too often installed just to become overgrown and messy within a few years due to lack of maintenance.

Seven Essential Aspects of Yard Maintenance

  • Watering
  • Mowing
  • Mulching
  • Weeds
  • Insects
  • Pruning
  • Fertilizing

If you want to learn about all these things, you came to the right place. This article will help guide you in the right direction.

Watering

Water is the lifeblood of our plants.  Maintaining moisture levels is crucial in managing our landscape.

Water carries organic compounds and nutrients throughout our plants and allows them to carry on the process of photosynthesis. An under-watered plant will look discolored and wilted. By the time that you notice a plant wilting, you are already too late, and you need to water immediately.

There are some simple rules to follow when it comes to watering:

  • Water new plants more often. It is a common fact that new plants need more watering to survive. Whether you are caring for a newly planted seed, flower, shrub, or tree, the concept is the same. The new seed or plant has an underdeveloped root system (or it just had its root system trimmed when it was transplanted). This leaves it struggling to take in enough water to sustain its growth.
  • New plants should be monitored daily and watered any time the soil starts to dry. Stick your finger in the soil and see how it feels. A bit moist is perfect, muddy is too wet, dry is too dry for a new plant. Keep in mind that the size of the plant matters. Logically, the roots of a newly planted large tree will be a couple of feet below the surface, so long deep waterings are more beneficial, whereas the roots of new grass seed are right at the surface, so a very light watering will do just fine.
  • Once you get to know your yard, a quick walk-through should be enough to tell you which areas, if any, need water. Don’t make the mistake of drowning your plants. Plants need water, but they also need oxygen. If their roots can’t take in the required oxygen, the plants will die.
  • Many newbies will plant too deeply and water too heavily, which will result in plant death. New plants will benefit most from consistently moist soil.
  • Don’t just set up a sprinkler on a timer and let it go. You need to monitor the conditions.
  • Established plants need less care. After a month or two, your plants will be more self-sufficient, and you can check on them once or twice a week. Most homeowners find that they have one or two problem areas or more delicate plants that need to be monitored more closely. These plants or areas can often be used as indicators for the rest of the yard.
  • Established plants need less attention from you Once the plants’ roots have caught up to their growth, they become very good at seeking out and taking in water.
  • Experts say that for a larger tree or shrub, the first year after planting, they are in recovery, the second year they stabilize, and the third year they should start to flourish.
  • After the first few months, most plants will be fine if you live in an area that gets sufficient rainfall. An experienced gardener has a feel for the land and nature and can tell when things are getting too dry and will need watering. As long as you take a walk through your yard now and then and pay attention to the soils and plants, you should be able to tell which if any areas need more water.
  • Watering in the late evening, during the night, or early morning is suggested. Temperatures are typically lower during these times; therefore, less water evaporates. Also, watering mid-day in the hot sun can leave water droplets on the plant leaves, which can tend to result in leaf scorch for some of your more tender plants. It’s a bit like how we humans can sunburn more easily when we are wet.
  • Don’t over irrigate. Some people feel that an irrigation system is necessary to maintain their landscapes. This is only true if you are trying to have a green landscape in a climate that would otherwise be dry and brown.
  • For most parts of the United States, planting the correct plants for your area and watering them a bit while they are adjusting to their new surroundings is all the attention they need.
  • Consistently watering with an irrigation system leads to underdeveloped shallow roots dependent on irrigation to survive. Well-established plants that have been allowed to acclimate to the actual environment that they live in will be much more healthy and pest and drought tolerant in the long run.
  • Every plant has its own needs, but some are very similar. Please spend some time researching the plants that you intend to grow and plant them in areas of your yard that are suitable for their ideal growth. This will significantly reduce the amount of attention that they need from you.

Much energy and resources are wasted by us humans trying to get plants to grow where they don’t belong. If we plant native species in proper areas, we can all live happily ever after.

Mowing and Lawncare

Mowing your lawn is another essential part of caring for your landscape. This is the area of landscape care that most people feel more comfortable with. Most of us have cut some grass at one time or another, and in general, grass is very forgiving and hardy. Your lawn can take a lot of punishment, so don’t spend a lot of time worrying about it.

Here are some tips to make this task a bit easier than it is already:

  • Your lawn is made up of millions of small blades of grass. Each of these is an individual plant that is not so different from any other plant in your yard. Treat it this way, and life will be good.
  • If your lawn is newly seeded, keep it moist.
  • Once established, a few really deep waterings during the driest parts of the year will encourage deep root growth and will likely benefit the plant.
  • Daily irrigation is a waste and results in shallow roots and a weak lawn.
  • Cut your lawn to a height of no less than 3″.
  • Taller grass resists weeds and disease more easily, keeps the soil cooler, requires less water, and promotes deeper roots.
  • Never cut off more than 1/3 of the blade at one time. This means that if you are keeping your grass at the recommended 3″ and it gets to be 4 1/2″ tall, it is time to mow.
  • Change up your patterns while mowing to reduce wheel damage to the lawn. If you are using a zero-turn mower, watch out for wheel spin!
  • Keep an eye on the color. If the grass is starting to yellow, it probably could use a bit of fertilizer. I’d suggest an organic fertilizer so that you are not adding to the chemical pollution of our soils and water. There should be no reason to fertilize more than twice per year. Any more than that is likely a waste of time and money unless your soil is horrible. My lawn is old and established and never gets watered or fertilized.
  • Always leave your clippings on your yard. Leaving the clippings is merely allowing the nutrients to go back into the soil.
  • A mulching mower is your best bet.
  • Keep your blades sharp—the cleaner the cut, the quicker the plant recovers. Just like us. Have you ever noticed that a really clean razor cut on your skin will heal much more quickly than a rough and jagged cut? We are not so different from plants, after all.
  • If your ground is very compacted, core aeration will help. Many new subdivision lawns are very compacted due to the heavy equipment that has been used during construction and because the developer likely sold off most of the valuable topsoil. An older lawn with good topsoil won’t need aeration.
  • Your lawn will likely not need thatching. Thatching is a problem of overcut, over irrigated, and over-fertilized lawns. A healthy, diverse, and organic lawn shouldn’t need thatching.
  • As with any environment, diversity leads to strength. The more diverse your grass is, the more resilient your lawn will be. Having many different grass types (and dare I say even a few weeds) growing in your lawn will make it more resilient.
  • Over fertilized and over irrigated lawns are the most fragile. A lawn that is mowed properly needs very little attention. You do realize that grassy fields cover this earth, and no one ever fertilizes or waters them, don’t you?
  • Don’t freak out about water. Established, healthy laws will go brown during some of the driest times of the year, but they will bounce right back when it rains. That is nature’s way.
  • In the fall, simply mulch up the leaves along with the grass and leave them on the lawn. The mulched-up leaves will act as a fertilizer. If you have many trees and the leaves are thick, you may need to remove some of them. You don’t want thick, wet leaves matting down your grass. Back to logic, right? Little plants under heavy wet mats of leaves are probably not too happy.

Pests

Weeds and insects are part of our natural habitat, just like the pretty plants and the animals that we enjoy.  Part of being in balance with nature and your landscape is to accept that there will be some weeds and some bugs. It is unrealistic for us to think that we can completely control Mother Nature. We can help guide her in a direction that pleases us in our yard, but we can’t control her. To believe otherwise leads you down a path of great expense, frustration, and a chemical nightmare.

Weeds

There are many ways to control weeds that don’t include nasty chemicals. Possibly the most earth-friendly alternative is cover. Cover the bare ground with a natural product and encourage the plants you like while discouraging the ones you don’t. So what does that mean?

Any bare ground is likely to grow weeds. To discourage them, we can cover the bare ground. There are many ways to do this, but one of the most natural ways is to use leaves and yard debris to cover the ground.

Pulling

Either way, you will need to spend time pulling weeds. It is important to stay on top of this task so that it doesn’t get out of control. It is easiest to pick weeds right after it rains when the soil is the softest.

Most of the tiny new weeds can be pulled by hand, while larger, more established weeds will need to be dug out using a shovel or trowel.

Please do not resort to chemical treatment as this will only kill the existing weeds and do nothing to kill the new weeds, so once again, it is a vicious circle. You spray, the weed dies, the hazardous chemical leaches into your groundwater, a new weed grows, you spray again, and so on. Costly, frustrating, and not at all earth-friendly.

Your money and time would be better spent hiring a neighbor kid or your kids to pick the weeds once a week over the summer months.

Lawn Weeds

Okay, now let’s talk about lawn weeds. It’s once again about cover. A tall, lush, and healthy lawn will shade the ground and allow less weeds to grow than an unhealthy, short-cut lawn that leaves bare ground exposed. Remember our discussion about diversity. A lawn with a few weeds growing in it may not look like the links at Whistling Springs, but it will make for a more resilient lawn.

If you really can’t bear having any weeds in your lawn, then there are organic weed control choices that use corn gluten to control the new weeds from sprouting. If you have larger, more established weeds, a small trowel will usually take care of them.

Insect Control

I have been landscaping a very long time, and I have not come across insect problems that were much more than a nuisance. For the most part, the insects will feast on a plant’s leaves and then move on. It is rare for an insect to kill the plants, but there certainly are exceptions. Typically, a naturally maintained and healthy plant can resist the insects on its own without help from us. I would not sweat it. If the chewed leaves bother you, you can try to apply some neem oil, an organic oil that discourages leaf eater.
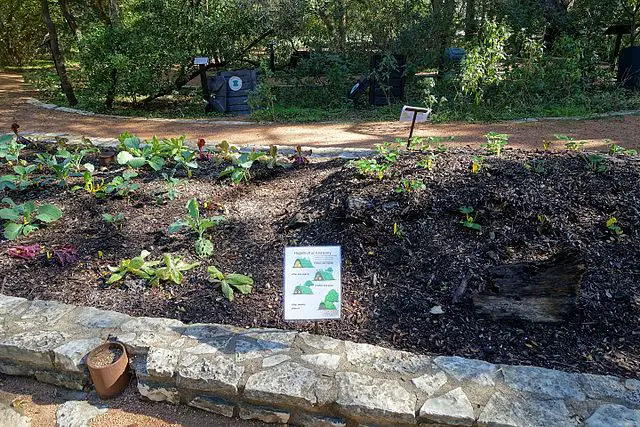
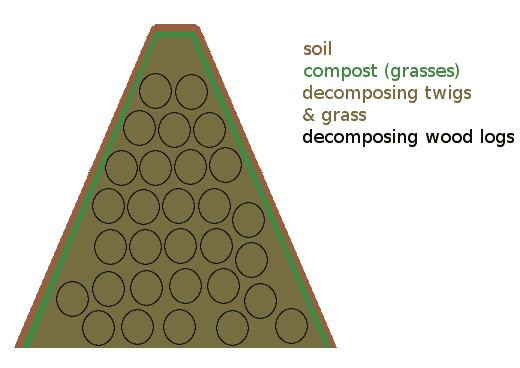
Mulching

You should take all leaves, sticks, etc., that collect in your yard and use them to cover the bare ground in your beds. If that is not enough, purchase a natural wood mulch to cover the remaining bare ground. A nice thick layer of decomposing wood and leaves will make a nutrient-rich barrier to the weeds growing up from beneath and make it easy to pull out any weeds that start from seed on top.

All of this natural material will decay over time, making your beds more fertile every year. Why do you think that the forest floor is usually relatively weed-free and covered in very fertile and soft topsoil?

When you buy mulch, please buy the natural or recycled variety. And don’t have them spray it with some odd-looking color that will fade and look even worse in a few years. Remember, natural is better. Everything decays and goes into our soil. We don’t need to add more chemicals to our earth.

The Circle

I am always amazed at the ridiculous circle that many homeowners and landscapers create. The homeowner pays to have all of their leaves raked up and hauled away in the fall, and then they pay to have wood mulch spread on their beds in the spring. Okay, let me get this straight. You want me to haul away a wood product and then bring you back a different wood product?

It doesn’t make much sense.

Fabric?

An alternative to heavy mulching would be to use landscape fabric to cover the bare ground and then cover that fabric with mulch or stone of some sort. Landscape fabric does a great job of keeping all of the plants below from coming up, but it does not stop the seeds that land on the top from growing. So, while it will kill off the already existing weeds, it won’t prevent new ones, and it keeps your mulch from decaying into the soil and fertilizing your beds.

If you are an avid gardener, you will not want to use fabric because it restricts your perennials’ ability to spread as they would naturally, and it also makes it harder for you to change your plantings and split your perennials.

A great alternative to fabric is thick layers of newspaper or cardboard. These products will kill off the existing weeds and will simply decompose over time. Did I just find a use for all of those old Amazon boxes?

Pruning

Pruning is the stuff that frightens new landscapers the most. So I need to clip off parts of these plants that I bought? That sounds dangerous! It can be, but mostly for you. Good pruning shears are very sharp. I’d be lying if I said that I haven’t seen a couple of newbies slice into their own fingers over the years. Just stay calm and make sure that you are cutting a twig and not your finger.

Many of the plants in your yard will never need pruning, so don’t get too excited. Once again, the more natural our yards are, the less maintenance we will need. This goes for pruning also. Most of the pruning that I have done over the years has been to control a plant that is too big for the space in which it is planted or to keep a plant the desired shape, rather than its natural shape that it wants to grow to.

Here are some general tips:

  • Most plants will not enjoy heavy pruning. Keep it to a minimum and do it more often if needed. Typically, you never want to prune off more than 1/3 of anything (just like your grass).
  • For the most part, you will want to prune while the plant is dormant. Usually, late fall or very early spring works out well. Once again, it is very logical. Cutting branches off a plant in its most vigorous growth period (spring) will not make it happy.
  • Plants that bloom on old existing wood can typically be pruned right after they bloom so that you are not cutting off next year’s blooms.
  • Dead flowers can typically be pruned off perennials, which will likely encourage more blooms.
  • Cracked, split, extensively chewed, damaged, or dead branches should be removed.
  • Always make your cut just after a bud or lateral branch. Again, sound logic. Leave the branch ready to grow again.
  • Always use sharp tools and make clean cuts.
  • Use a tool sized for the job. I have often seen newbies using a small hand shears to cut a 1″ branch. As they squeeze with both hands and twist that shear, they are not only damaging the plant; they have also likely bent the shear and ruined the blade. Stop, go get a lopping shear or a small hand saw.
  • When pruning for shape, prune a bit, stand back and look at it and then prune some more. Walk around the plant to see what it looks like from all sides.
  • Never use a pole pruner near electrical wires (it seems obvious, but it happens all the time).
  • Don’t cut the top off of a tree with a strong, dominant center stem (think Spruce tree)

Shaping

Most of your pruning will likely be shaping. You are merely trying to prune that plant as little as possible to retain the shape or size that you need it to be. Most homeowners run into trouble because they wait too long.

Plants get planted, they grow for several years, and then one day, you walk outside and say, “Wow, that shrub has grown way too big!” At this point, it is already a problem. Had you trimmed it a bit every year, it would likely be well-shaped and in control, but now it is way out of shape, blocking half of your window and rubbing on the side of the house.

The sad part is, you may be better off removing it and trying again with a plant more well suited for the spot. But you did spend your hard-earned money on this one, so it may be worth a try.

Rejuvenational Pruning for Single-Stemmed Plants

When we are trying to rejuvenate a single-stemmed plant that would otherwise need to be removed we are using most of the rules above, but we are pushing our limits in an effort to avoid needing to completely destroy the plant.

Single stemmed plants include most trees and any shrub with only one stem coming out of the ground. Be aware that stem count is not the only factor. Even if the plant has multiple stems, it is in this category if it does not sprout new stems from the ground every year. Most woody plants are in this category. Examples of plants like this are Burning Bush, most Viburnum, Amelanchier, Maples, Oaks, Ash, etc.

The single-stemmed plant can be pruned back only so far before you would be left with nothing but a stump. This is never recommended; it will likely die. You can thin it out by removing some of the internal and interfering branches, and you can downsize the remaining branches as much as possible, keeping in mind that this poor plant will need some branches to grow some leaves on when spring arrives. Vary your cuts in height and shape the plant into a shape similar to its natural form. You will end up pruning off more than 1/3, and the shrub will likely sprout back if you didn’t push too far, and it dies.

When it sprouts back, you hit it hard again for the next several years, each year striving for that size that you would have liked it to be. In general, if this hasn’t worked after three seasons, you might as well replace it with something more well suited.

Rejuvenational Pruning for Multi-Stemmed Plants

Multi-stemmed sprouting plants have many stems coming out of the ground and sprout more every year.  These get wider and wider at the base every year and spread quickly.  Examples would include plants like Dogwood, Spirea and Lilac.

This type of plant, if it is in good health, can typically be cut down to the ground, and it will re-sprout in spring. I’m not saying that this is the best route to go, but sometimes it is a good choice.

If you are not ready to go that drastic, you should start by removing a bunch of the thickest, heaviest stems. Cut these big ones right down to the ground. After that, use staggered cuts at varying heights to trim what remains of the plant into the size and shape that you desire. By cutting out the thickest and heaviest stems each year, you will be able to keep these shrubs whatever size you would like, and they will always look good.

Hedging

Another pruning style that seems to be very popular with homeowners is hedging.

Typically hedging would only be used on plants that are well suited for this technique. Plants like Arborvitae, Boxwood, Yews, etc., take well to hedging.

But, it seems that once a homeowner buys that motorized hedging shears, it becomes the go-to pruning tool for everything in their yard. It is pretty quick and efficient but not ideal for many plants.

When you hedge a plant, you are trimming off all branches at the same height. This causes the branches to send out extra shoots from this level each time you hedge. Over the years, this will leave you with a plant that only has leaves on the outside perimeter and nothing growing in the middle.

This becomes a problem when you decide to downsize that plant. You will cut a bit too far and realize that it is hollow and empty inside. Not great.

Twigging

If you are a fan of the hedging shears, please use them sparingly and realize that any sheared plant should also be thinned a bit to let light into the center near the trunk.  Shear it and then take your hand pruner and prune out some of the more densely branched and leaved areas to allow sunlight in. If you do it right, you can maintain a healthy hedge with a great shape.

Fertilizing

The entire chemical fertilizer industry was built on our desire to grow the same plant repeatedly in the same soil and maximize that plant’s growth while not allowing the soil time to recover.

Once again, diversity is king.

You may want to do a bit of reading on permaculture. Anyone trying to sell you on the thought that you need to apply chemical fertilizers to your landscape is merely pushing product.

You should strive to grow a native and diverse selection of plants that are well suited for where they grow. You will also want to use leaves, grass clipping, and mulch as natural fertilizers. Don’t haul them away; use them to nourish your soil. If you do this, you will have very little need for fertilizer.

If you feel the need for fertilizer, please choose some of the many organic fertilizers that are now available, read the label and help preserve our earth for the future.

It is simply criminal the amount of chemicals many homeowners dump onto their landscapes every year in the pursuit of the “perfect” yard. We are poisoning this earth.

Final Thoughts

Well, there you have it. It is probably more than you wanted to know, but if you follow most of the suggestions above, maintaining your yard won’t be as hard as many people make it out to be. If we work with Mother Nature, the experience can be quite pleasant and rewarding. If we work against her, it can become quite miserable and detrimental to our happiness and the happiness of this earth.

What is Hugelkultur?

Hugelkultur is a German word that stands for Hill or Mountain Culture. It is a horticultural technique in which the decaying wood and other decomposed plant material are used to build a mound that serves as a raised bed for planting a garden. Hugelkultur is earning fame among the home gardeners due to its low maintenance way of growing annual vegetables and flowers.

Wood is composed of varying concentrations of both primary nutrients (Carbon, Oxygen, Hydrogen, Nitrogen, Potassium, and Phosphorus) and secondary (Calcium, Magnesium, and Sulphur) nutrients. Buried wood decomposes slowly and becomes a source of a continuous supply of nutrients (for more than twenty years). This practice is often adopted in permaculture and has a long history.

To create your very own Hugelkultur garden, you simply stack up various sizes of deadwood and cover it with soil.  You can use most types and sizes of wood, and you can sprinkle in any sort of organic matter that you have in your yard.  Leaves and grass clippings will only add to the decomposition of the wood.

Why are you hauling away or paying someone to haul away your leaves, twigs, and grass clippings when they could be used to grow your next garden?

History

As the word Hugelkultur belongs to the German language, you may have already guessed that it has been practiced in Germany for hundreds of years.

A comparison in plants’ growth rate grown on flatland and mound-culture was made. The results showed that the mound cultured plants were healthy (never expressed any nutrient deficiency and were never fertilized). The growth rate was fast, and the growing season was also extended due to the heat generation of buried wood.

Hugelkultur earned fame in Eastern Europe, Australia, America, etc., due to its remarkable benefits for both soil and plants. This is a principle permaculture technique followed by many gardeners and landscape designers.

The Science Behind Hugelkultur

“Sowing of seed to raise the seed again and use of wood to raise the wood again” is the logic behind Hugelkultur.

 Hugelkultur is a biological, principles-based process. It is a large-scale, inexpensive, soil and microorganisms-friendly compost blended mulch placed under the soil surface. This decomposing organic material provides a very long-lived source of soil fertility and creates a very rich bed of thriving microorganisms below the plants. Building a Hugelkultur bed will give any gardener a very unique and healthy area to plant into.

Best Types of WoodFor Hugelkultur:

  • Golden Chain Tree (Laburnum alpinum)
  • Alders (Alnus glutinosa)
  • Apple (Malus domestica)
  • Aspen (Populus tremuloides)
  • Birch (Betula pendula)
  • Black Cherry (Prunus serotins)
  • Cottonwood (Populus deltoids)
  • Camphor Tree (Cinnamomum camphora)
  • Cedar (Cedrus deodar)
  • Maple (Acer planatum, A. rubrum)
  • Oak (Quercus robur)
  • Poplar (Populus nigra)

Before burying the wood, it is good to make sure that it is aged and dead. Otherwise, they may start sprouting. Hardwood usually breaks down slowly, and the Hugel bed lasts longer. On the other hand, softwood breaks down quickly, releasing nutrients rapidly to support plant growth. It is recommended to place a layer of small woody branches at the top of the softwood layer and hardwood at the bottom to release nutrients first from the most easily decomposable wood. The decomposition process consumes a large amount of nitrogen first and then releases the nitrogen to compensate for the deficiency.

Unsuitable Wood For Hugelkultur:

  • Black locust (Robinia pseudoacasia)
  • Black walnut (Juglans nigra)
  • Old redwood, California redwood (Sequoia sempervirens)

These woods do not decompose easily or release toxic substances that may harm the above growing plants. Black walnut’s roots release “Juglone,” an organic toxic that stops other plants’ growth.

What kind of plants grows best in a Hugelkultur bed?

  • Onion, peppers, rosemary, lavender,
  • potato, sweet potatoes
  • gourds, cucurbits, pumpkins, melons, and strawberries
  •  are all plants that will thrive.  You can also do what they call pizza gardening.  You can efficiently grow all the ingredients used in pizza making, i.e., bell-peppers, onion, oregano, Italian parsley, basil, etc.
  •  Also, you can grow all sorts of ornamental flowers, shrubs, and trees.

According to Dave Whitinger (Executive Director at the National Gardening Association in Texas),  “I cannot think of anything that does not do well in a Hugelkultur bed.”

Requirements for the Construction of Hugelkultur

hugelkultur at zilker botanical garden
hugelkultur diagram

There are various ways of building the Hugel depending on the type of gardening you are planning.

As when creating any garden bed, you need to pay attention to the plants’ sunlight requirements that you are planning to grow.  Hugelkultur is excellent, but it won’t make up for having a sun-loving plant in the shade.

The second thing you will want to consider before constructing the wood mound is your plants’ average life span. If you are planting a kitchen garden and short-lived annual or biennial plants, you will likely want a smaller pile of logs comprised of smaller diameter wood that will decompose more quickly.  If you are planting slower-growing long-term perennials, shrubs, trees, and vines, you can use larger diameter logs that will take much longer to decompose and will fertilize for a good portion of the life of the plant. 

How it Works

Decomposition of wood utilizes high concentrations of nitrogen, and the soil becomes deficient in nitrogen. So, it would be best if you grew plants (winter vegetables, Onion, Gourds, potatoes, etc.) that need very little nitrogen for the first year or two so that you do not need to provide supplemental fertilization.

After partial to complete decomposition, the nitrogen deficiency will be compensated for by the decayed wood material. At this point, you can plant the more nitrogen-demanding plants.

It is recommended that you make long beds or round mounds with spaces in between so that you can easily tend the beds.  Your beds’ size and shape will depend significantly on the type and size of wood that you have available.

Benefits of Hugelkultur

Replication of a Natural Process

Hugelkultur is said to be a process that restores soil fertility in a very natural way. The wood’s slow decay makes it porous, just like a sponge. It stores water and creates plant nourishing nutrients which are later released to nurture your plants.

Increased Soil Aeration

During the decomposition process, the wood absorbs water and expands, creating air pockets. It creates a similar benefit to tillage without employing any mechanical process. Mechanical tilling of soils destroys a large number of beneficial microorganisms. Hugelkultur provides an environment where these earth-nurturing microorganisms thrive.

Increased Soil Fertility

For the most recent twenty-to thirty years, farmers and gardeners have been using synthetic fertilizers and mechanical tilling to get quick results. The synthetic fertilizers (Urea, DAP, SOP, MOP, NP, etc.) do not add anything to the soil. On the other hand, organic fertilizers, including compost, farmyard manure, leaf litter, poultry manure, wheat straw, etc., are slow-releasing substances that increase soil fertility and are environment friendly. Once buried and decomposing, these mounded beds of logs will not need any fertilizer or additional nutrients for more than twenty years.

Long-Lasting Plant Establishment

As compared with vegetables and annual plants, longer-lived plants such as grasses and shrubs are very well suited for this method.  Long-lasting plants with a rich, stable source of nutrients and soil amendment built into the bed. The steady release of nutrients supports continuous foliage development, and the aeration helps prevent soil compaction.

Food Security

Mound structures produce and hold more plants per square foot of land than flatland. The food security analysts state that the size of 1,076-2,153 sq. ft. would be enough for a single-family of four to six members. Hugelkultur serves as a long-term, efficient, space-saving source of food.

Soil Erosion Prevention

Hugelkultur also helps to prevent soil erosion.  The mounds help slow any water runoff and create a very porous area of ground for the excess water to soak into rather than runoff.  In an ordinary flat garden, water is allowed to run off, and tillage is required to keep the ground soft.

Disadvantages of Hugelkultur

  • Hugelkultur can require large amounts of wood if you are creating large beds.  This is great if you own a large property with large amounts of deadwood, but it may get costly if you need to purchase the wood.
  • Hugelkultur beds may become the home for rodents.  Piles of logs covered with ground might be perfect places for rodents to create a burrow.

Permaculture and Hugelkultur

In permaculture, we design the landscape to make it sustainable and efficient both in terms of energy and longevity. The same is the case with Hugelkultur; we put in our effort once and then get benefits for twenty to twenty-five years. Isn’t it a good idea to collect the pruned woods, dead trees, and broken twigs from your garden and use them in mound culturing? Of course, it is.

In this age of many commitments and busy schedules, everybody wants a type of gardening that is easy to maintain, produces the best quality product, and contributes to improving the environment.

Conclusion

Hugelkultur is a systematic step towards sustainable, successful landscaping. It is helping to raise crops by providing nutrients to them, and it is also fertilizing and enriching the soil with its excessive biomass at the same time. If you look at the advantages and disadvantages of Hugelkultur, you will find that its benefits far outweigh any disadvantages. With the amount of wood waste that we produce, we could feed the world and improve thousands of acres of land annually.

Overall, the benefits of Hugelkultur far outweigh the costs.  Find yourself a nice sunny area near the edge of your yard and begin to build your Hugelkultur garden.  You will find it to be a satisfying gardening experience that will pay dividends for years to come.

References:

Laffoon, M. (2016). A Quantitative Analysis of Hugelkultur and Its Potential Application on Karst Rocky Desertified Areas In China.

Ewald, A. (2011). Hugelkultur on the Prairie, or Learning from Our Mistakes. Communities, (153), 30.

Shebitz, D., Capozzi, S., & Albaum, J. P. (2010). Planting More than Just Veggies: Student-Created Plans for a Sustainable Urban Farm. Education, 2010.

János, S. A., Hayes, M., & Béla, B. THE SYSTEM, PROCESS AND STEPS OF PERMACULTURE DESIGN, DEMONSTRATING WITH A PRACTICAL EXAMPLE IN THE OPEN-AIR MUSEUM OF SZENNA.

Mireskandari, L. (2016). Urban Permaculture Educational Business. School Gardens, Permaculture And Business Design: An Exploration Of School Gardening Obstacles And Solutions.

Chalker-Scott, L. (2017). Hugelkultur: what is it, and should it be used in home gardens?

Holmgren, D. (2002). Permaculture. Principles and Pathways beyond Sustainability. Holmgren Design Services, Hepburn, Victoria.

Hemenway, T. (2015). The permaculture city: regenerative design for urban, suburban, and town resilience. Chelsea Green Publishing.

Muthu, N., Shanmugam, B., Gopalsamy, P., & Edwin, G. A. (2015). Implementing a holistic and student centered outreach programme towards integrated sustainable development of the campus—a case study of a Residential School from South India. In Integrating Sustainability Thinking in Science and Engineering Curricula (pp. 591-612). Springer, Cham.

PONTES, T. M., & ZANATTA, G. V. (2018). Horto medicinal do corpo humano: ação pedagógica interdisciplinar na Amazônia. Cadernos de Agroecologia, 13(1).

How to Plan, Plant and Care for a Garden

When we are talking about how to plan, plant and care for a garden, we are not just talking about vegetable gardens.  A garden can be any piece of land that we designate for planting. Gardens usually have some soil amendment and are often used for aesthetic appeal, recreation, or production.  Our gardens can be planted with trees, shrubs, flowers, vines, or any number of various food crops. 

“We may think we are nurturing our garden, but of course, it’s our garden that is really nurturing us.”

Jenny Uglow

While a garden may have trees, it should not be confused with an orchard. A garden is likely to contain a wide variety of plants; (trees, flowers, shrubs, medicinal plants, vegetables, fruit plants, grasses, etc.), while an orchard will typically only have fruit or nut trees.

Humans have been arranging and cultivating plants in their gardens for a very long time.  We have a long history of manipulating nature’s plants to serve our needs.

There are many different types of gardens:

  • Public gardens
  • Residential gardens
  • Zoological gardens
  • Botanical gardens
  • Native/natural gardens
  • Tea gardens
  • Water gardens
  • Formal gardens

Establishing a garden on your property is a long-term investment of your time and effort.  If you are going to commit to establishing a garden, it’s best to start on the right foot.

Begin with a Plan

“An Hour of Planning Can Save You 10 Hours of Doing”.

Dale Carnegie

Whether you are planning a tiny little corner garden next to your patio, or an extensive series of garden beds through-out your yard, you’ll want to plan ahead to be sure that you use the space you have in the best way possible.  What exactly that sentence means is entirely up to you.   It’s your space; make the best of it.

All gardens have plants, and the most critical factor in your garden’s success will be the health of your plants.  No matter how well you care for them, plants will only thrive when they are planted in a location that is well suited to supply them with what they need.

Every plant has a specific range of temperatures, sunlight, and moisture that it is well suited for.  Any plant that you are considering for your garden will need to be researched to be sure that it will grow well in your garden and have enough space to develop long term.

Some common plants to consider for temperate regions:

  • Deciduous: oak, maple, poplar, locust, ash, birch, fruit trees, etc.
  • Evergreen:  pine, fir, spruce, juniper, cedar, boxwood, etc  
  • Shrubs: lilac, viburnum, spirea, honeysuckle, hydrangea, dogwood, chokecherry, alder,  etc.
  • Flowers: coneflower, iris, daylily, hosta, daisy, astilbe, yarrow, dianthus, columbine, etc.  
  • Ground Covers/Grasses: periwinkle, pachysandra, ivy, thyme, fescue, rye, etc.

Some common plants to consider for tropical/sub-tropical regions:

  • Trees: date palm, eucalyptus, cypress, citrus, crepe myrtle, fringe tree, etc.
  • Shrubs: gardenia, hibiscus, azalea, bottlebrush, plumbago, oleander, etc.
  • Flowers: bird of paradise, amaryllis, bougainvillea, aloe, agave,   etc.

Plants are a critical part of your plan but not the only factor.  Most gardens have a purpose, and you’ve got to determine the purpose of yours.  If it is purely aesthetic, it will be built differently than a vegetable garden, which will be constructed differently than a patio garden, etc.

Plan for aesthetics by planning out the layering of plant material to give the best, most pleasing view of all of your plants.  Plan for diversity, pattern, texture, balance, and open space to create the interest and feel you desire.

Plan for function by arranging plant material to be easily maintained.  A natural perennial garden will have much different maintenance needs than a vegetable or herb garden, so plan accordingly and leave yourself space to work.  If you can’t access your garden to maintain it, chances are it will become a mess in short order.

Soil tests

Many folks will advise you to have your soil tested before starting a garden.  If you are planting very finicky and particular plants, you may want to start with a soil test.  However, soil tests are far from necessary.  Remember, this has been happening since the first human transplanted a food source closer to their home.  They certainly didn’t have soil tests back then.

I have been landscaping my entire life and have never had any soil tested.  This sort of falls under the category of “if it ain’t broke, don’t fix it.”

If plants are growing in the soil now, you know that it is likely fine to plant into.  The only time that

I would test if I am planting some prized plant that requires precise ph levels.  Other than that, I would amend and plant. 

On the other hand, if your proposed garden location is a patch of ground that has been barren for years and doesn’t grow anything, you may want to test it because if it isn’t growing weeds, it is not likely that it will grow your plants.  But, if you have ground this bad, you might want to scoop it out and replace it with some highly composted organic soil to make it easy on yourself.

Irrigation

The type of irrigation needed for your garden will vary widely, depending on its location.  If it is in a well-balanced temperate zone and you plan to grow plants that are well suited for your zone, there will be very little need for irrigation.  If you are trying to plant a vegetable garden in a very arid climate, you will definitely need irrigation.

My advice on irrigation is to manually use mobile sprinklers or soaker hoses and create a temporary system using garden hoses to establish your plants.  Unless you are a commercial grower where you are line-planting hundreds or thousands of seedlings every year, your typical garden does not need hundreds or thousands of dollars of irrigation installed in it.

If you are growing vegetables, you will appreciate that the old hose and sprinkler or soaker system is easily adjusted and altered for future plant type or layout changes.  You will also appreciate the economy of pulling out a sprinkler only when you need it, rather than paying to install a complicated system that you don’t need once your plants are established.

An exception to this might be an annual flower bed.  Suppose you are creating a bed for annual flowers, and it is in the bright sunlight. In this case, it might be nice to have a well-disguised, permanent irrigation system with an automatic controller so that regardless of what you plant year after year, you can be sure that it is getting enough water on those hot summer days.

Types of Irrigation

You will either be looking at drip or broadcast irrigation for the most part.

Drip Irrigation

Drip irrigation is just what it sounds like.  It is a series of tubes or hoses spread throughout your garden attached to little lines that drip the water out onto specific areas of the soil. Or it can be soaker hoses that are pressurized and allow the water to soak through the hose evenly wherever it is run.

Drip irrigation has the advantage of being great for water conservation. The water is not thrown into the air where it can evaporate and be blown astray by the wind; it is instead applied directly to the soil.  A downside would be that if the drip system isn’t laid out properly, you could have some areas that get plenty of water and other plants that get none, simply because the drip line wasn’t placed close enough to them.

Drip irrigation makes it easy to be very accurate with your irrigation.  You can easily lay it out to allow different types of plants, while in close proximity to each other, to receive very different levels of irrigation.  You can also run selective drip to only certain select plants that require more water while not providing any irrigation to the rest of the garden.

Drip is also advantageous because it doesn’t spray down the entire plant, damaging leaves on more delicate plants.

A disadvantage to drip irrigation is that it is typically much harder to install since you aren’t simply spraying water in from the outside.  Also, drip always makes it harder to make changes in your garden since moving plants might require different drip layouts.  Also, take it from a guy that knows it is really easy to damage drip irrigation with your shovel if you aren’t the most careful gardener.

Broadcast Irrigation

A broadcast system is quite different than drip in that it just shoots water out over the entire bed.  You can adjust how much water to put on the bed, and you can change the arc to allow for it to shoot further or less far and only rotate to a certain angle, but for the most part, everything in the bed will get watered.

If there are tall plants near the broadcast sprinkler, they are likely to get hit with a very hard direct shot of water which is likely to damage them.  If there are little plants behind larger plants, they may not receive water because the bigger plant caught it all.

Broadcast is easy to set up; whether you are burying a professional system or using plastic mobile sprinklers and garden hoses, the setup is very similar.  Run water to the sprinkler and position the sprinkler to cover everything you want to water.  These systems are easy to install and easy to change as the garden changes.

Drainage

On the other side of irrigation lies drainage.  Depending on your garden’s location and the type of plants that you are growing, you may need to consider drainage.  This isn’t an issue most of the time, but if you are changing the grades and pitches of the ground to create your garden, please take into consideration any drainage ways through your property.

The last thing that you want to do is carefully amend your soil and plant your plants, only to have half of it get washed away in a storm because you blocked the main runoff area on your property.  We always want to work with mother nature and not against her.  If at all possible, place your garden where it won’t be too wet or too dry and where it fits in well with the lay of the land.  Fighting the lay of the land will frequently cause problems, and often it just looks unnatural.

On the same note, always pay attention to the grades around your home.  Far too often, I have seen garden beds mounded up high against a house’s siding.  This presents two problems.  First, mounding soil around your foundation will encourage rainwater to run toward your foundation, which may result in a wet basement.  Second, the soil and mulch up against the siding will undoubtedly lead to rot, which can get costly and allow rodents to easily enter the house.

Soil Prep

Once you have determined your layout and the plants you’d like, you’ll want to prepare your garden soil.  While most garden beds are planted at existing grades or into a lightly mounded area, if there needs to be contouring of the ground before planting, do that before any soil amendments or planting.  You need to start with a good base that is adequately pitched and then move on from there.

Once the base is set, the best thing you can do for a future garden bed is to start amending the soil a year or two before planting.  If you plan ahead and layer compost into your garden over time, the ground will be rich, soft, and ready for you to plant into.

But, if you haven’t planned ahead and amended your soil well in advance, it would be a good idea to add some well-aged compost to the top layer of soil before planting.  I would caution you from using any chemical fertilizers, which increases our chemical load on the planet and puts your family in danger.  There are perfectly effective organic alternatives to every chemical fertilizer, so please go organic.

Soil enrichment

The new plants require greater quantities of primary and secondary nutrients during initial growth periods. Giving your new plants plenty of organic nutrients to grow with will help them succeed and thrive.  There are various organic soil enrichment methods.

Apply Compost

Compost can be just about any well-aged organic materials.  Some people compost using kitchen scraps, while others use a blend of tree-based materials and manure.  You need to make sure that it is well aged, as fresh manure can burn plants.

The easiest way to use compost is to spread it evenly over the ground and let it decompose into the soil, giving up its nutrients for your plants.  Continued thin layers are typically easier to apply than one big thick layer, although if you are starting a garden from scratch, don’t be afraid to lay it on thick.  Check out our article that talks about the lasagna method.

Another way to apply compost is to place it into the hole as you plant.  This method is often used by landscapers who are planting a handful of trees or shrubs as it is easier to amend just the soil for that plant rather than amend the entire area.  I would caution you, though, that amending the whole garden is always preferable, as it betters the soil composition of a larger area and encourages root spread rather than encouraging roots to stay in that one fertilizer-rich area.

Biochar

Biochar is the charcoal produced from the pyrolysis of plant or animal material. It is widely used for soil amelioration processes and the removal of carbon sequestration from the atmosphere.  Biochar is created by burning wood so that it leaves the charcoal.  This char is then used as a soil conditioner.

Planting Methods

Your planting methods will vary depending on plant availability, budget, and plant type.  If you are vegetable gardening, you will often be planting seeds.  It works well to lay out rows of the same kinds of seeds to keep it simple for weeding, irrigation, and harvesting.

If you are planting a flower garden or larger planting bed, you will typically use already established plants.  Most of these plants will come growing in the soil they were raised in, while some plants may arrive bare root.

If your plant arrives bare root, it is crucial that you dig a hole and create a sort of soil slurry with water, compost and soil to ensure that the roots get complete contact with soil and that there are not any air pockets that would lead to root death.

Post Germination Care

“It is easy to plant/sow the seed but difficult to care and grow.” The seedlings are sensitive when they emerge and should be protected from excessive irrigation (which may lead to fungal diseases), insects (attracted by the juicy and sweet seedlings), frost, etc.

Weed Control

Weeds are the unwanted plants that seem to always grow more easily and quickly than the plants that we want in our gardens.  We humans are a strange bunch; any time we find a plant or an animal that grows really well in our area, we label it as invasive and try to get rid of it.  We seem to want to grow only the very difficult plants to grow.  For some reason, we see the more difficult plants as more desirable.

Weeds can take over your more delicate garden plants fairly quickly, so you will want to stay on top of them.  Once again, I would strongly suggest that you stay away from chemical weed killers.  They are expensive, dangerous to our environment, and a very short-lived solution.

I would always recommend compost and mulch to help keep soils moist, soft, and workable and help discourage weeds.  Thicken up the organic material between plants and keep it thin right at the plants’ base.  Pull weeds as they sprout, and you will never lose control of the bed.

Pest Control

Pests like aphids and whiteflies can be controlled using a blast of cold water or organic horticultural oil in the form of spray directly on the pests. These methods will not harm the plants and some other beneficial insects.  I would never recommend chemical pesticides, as they are mostly non-selective and kill both helpful and harmful insects.

For the most part, I would plant according to zone, light, and water requirements and ignore most pest problems.  Well planted, healthy plants will usually be able to endure a pest, at least until some birds or other predators come and take care of the situation in nature’s way.

Annual Maintenance Practices

Pinching and deadheading – Pinching of long, leggy, spindly shoots of perennial flowers is good for them. Deadheading (nipping off finished blooms to prevent the plant from going to seed) will encourage re-blooming throughout the season.

Pruning – Some fruit plants like Grapes, Guava, Ber, etc., and flowers like rose, and shrubs like Hydrangea, Honeysuckle, etc., do better with pruning every season when they are dormant. These plants produce fruit on the new growth, so pruning will encourage more production.

Feeding – Fertilization requirements for trees, shrubs, flowers, and grasses will differ. It is good for the plants and the soil to use organic fertilizers like compost, rotten leaves, etc.  You won’t go wrong with the application of a nice organic compost over all of your beds.  If you have specific areas or plants showing yellowing, you may want to increase the compost or aged manure application. The recommended rate of well-aged farmyard manure (compost) is 20-30 pounds per 100 sq. ft. at the start of fall and not in the spring (active season of growth).

Conclusion

Establishing a garden is a time-honored tradition that improves your property in many different ways, which will, in turn, improve your life.  Enrich your environment to enrich your life!  The more that we compost and keep our yards green and chemical-free, the more our environment benefits.  If everyone adopted this attitude, our earth would be out of trouble in no time.  Okay, enough reading, go out there and plant something.  

References:

Spary, E. C. (2010). Utopia’s Garden: French natural history from Old Regime to Revolution. University of Chicago Press.

McClintock, N., Wooten, H., & Brown, A. H. (2012). Toward a food policy” first step” in Oakland, California: A food policy council’s efforts to promote urban agriculture zoning. Journal of Agriculture, Food Systems, and Community Development, 2(4), 15-42.

Williams, A. M., & Shaw, G. (2009). Future play: tourism, recreation, and land use. Land Use Policy, 26, S326-S335.

Hurd, A. R., & Anderson, D. M. (2010). The park and recreation professional’s handbook. Human Kinetics.

Lawson, L. (2004). The planner in the garden: A historical view into the relationship between planning and community gardens. Journal of Planning History, 3(2), 151-176.

Egli, V., Oliver, M., & Tautolo, E. S. (2016). The development of a model of community garden benefits to wellbeing. Preventive medicine reports, 3, 348-352.

Söderback, I., Söderström, M., & Schälander, E. (2004). Horticultural therapy: the ‘healing garden and gardening in rehabilitation measures at Danderyd Hospital Rehabilitation Clinic, Sweden. Pediatric rehabilitation, 7(4), 245-260.

Reichard, S. H., & White, P. (2001). Horticulture as a pathway of invasive plant introductions in the United States: most invasive plants have been introduced for horticultural use by nurseries, botanical gardens, and individuals. BioScience, 51(2), 103-113.

Kwon, J. W., Park, E. Y., Hong, K. P., & Hwang, M. H. (2013). Suggestions on the types of the distribution of gardens for the overseas establishment of traditional Korean gardens-Oriented the garden which is applicable to the open space. Journal of the Korean Institute of Traditional Landscape Architecture, 31(3), 106-113.

How to Mulch Properly

plant in mulch

We use mulch to protect and nourish the soil and help the plants that we are growing. This article will explain how to mulch properly, why it’s worthwhile, and how to make your own mulch from your lawn’s clippings.

What is Mulching?

Mulching is the process of covering the soil with organic materials. Gardeners have copied this principle from the wild because there is practically no bare soil in nature anywhere.  Leaves, broken branches, plants, or a humus layer usually cover the ground everywhere. This layer protects the plants and also provides them with nutrients.

What are the Benefits of Mulching?

Your garden’s soil is exposed to many external forces like wind, temperature changes, and drought. Therefore it makes sense to apply a protective layer on top — the so-called mulch. If you mulch properly, the soil stays moist, the wind can’t dry out the soil, water doesn’t evaporate as fast, and the mulch protects the soil from rain erosion.

The mulch layer also acts as a warming blanket, prevents weeds, and can accelerate your plants’ growth. In the case of fruit and vegetable plants (especially warmth-loving ones), mulch has been proven to increase the yield.

Mulch also encourages soil health by supporting a diverse assortment of worms, bacteria, and microorganisms that loosen the soil under the mulch and break down the organic cover. This makes the humus layer grow and enrich the soil with nutrients. Manual watering and cultivation become things of the past with a well-mulched bed.

How Can I Make Mulch?

Mulch is mostly made up of organic materials – which means you can easily make a proper bed cover yourself. If you have a lot of garden waste like hedge or lawn clippings, you can use them to mulch your bed. In autumn you can also use leaves and straw.

However, you should only apply thin layers of rich materials like lawn clippings so that they can decompose evenly.  Thick, wet piles of lawn clippings aren’t doing you any good; layer your yard compost throughout the bed. Shredded wood scraps or chopped straw, or ornamental grass stems are other materials you can use, especially for fruit trees and berry bushes, as they like warmer environments.

If you have a lot of wood waste in your yard from pruning trees, for example, then you can shred it in a chipper. However, keep in mind that the wood chippings bind a lot of nitrogen and may lead to short-term soil deficiency until they decompose.  Once again, it is all about diversity and layering.

If you have a snail problem, you might need to use reeds as your mulch material, which will help you keep them away. Shredded herbal plants are another excellent material for keeping pests at bay.

Finally, always try to add compost to the soil each planting season because it acts as a fertilizer, and it promotes soil microbes that aid plant growth.  Thin layers of compost applied all year round will mimic how nature applies leaves and plant debris to the soil surface.

Best Mulch Products

If your mulch production is too time-consuming or your garden waste is not enough, you can always buy it from your local gardening store.

Bark mulch is especially popular because it is suitable for shrubs and hedges and effectively suppresses weeds. The shredded tree bark can also act as an excellent surface for your garden paths.

Wood chips are sometimes referred to as mulch as well and can be purchased in many wood varieties and coarseness.  Often, the very course chipper chips can be had for free from a local town or tree trimmer who needs to get rid of the chips from their work.  Be aware that the more course your chips are, the longer they will take to decompose.  Shredded mulches will decay much more quickly than chips.

Alternatively, you can also use gravel or stone as a soil cover, which will help to shade the soil from the sun and may retain some moisture and help to keep the weeds down., but rocks aren’t technically mulch since they don’t decompose and turn to soil over time.

How to Mulch Properly

Before you apply the mulch to your beds, you will likely want to remove any weeds present or cover the weeds with a biodegradable material such as newspaper or cardboard.

You can then start spreading the mulch. Make sure you apply the material around the plants but keep the mulch very thin near the plant’s stem.  Piling organic material against the stem of a plant will cause rot and will also encourage rodents to spend the winter there eating the stem of your plant.

As you move away from your plants’ stem, you can get thicker and thicker with your mulch.  Put maybe 2-4 inches anywhere that the plant roots are, and feel free to go thicker in bare open soil areas.  Thicker mulch will discourage weeds. The mulch should be lying loose and not be worked into the soil.

It is best to have the ground covered all year round. There is no right or wrong time to mulch. In winter, the straw or foliage mixture offers protection against frost and rich nutrients for your plants in the summer.

If you have freshly sown beds, wait before mulching. Thick mulch cover over seeds or tiny plants will surely reduce plant growth.  Once your seedlings are about four inches, you can safely cover the soil up to the leaves’ base.

Mulching with Lawn Clippings

Lawn clippings, which can be found in most gardens anyway, are an excellent mulching material as long as the blanket is not thicker than an inch. The finer the cut of grass is, the better for the soil. After all, long stalks are difficult to decompose.

For the most part, you will want to use a mulching mower and leave your clippings on the lawn to help enrich that soil, but if you do collect grass clippings, you can definitely spread them on your beds as mulch.  As mentioned before, just keep the layers thin and mix with various other organic materials.

Final Words

Mulching is an essential part of gardening as it benefits both your growing plants and your soil. When you mulch your beds, you will not need to water, fertilize, or remove weeds as much. The plants benefit from the warming layer and the nutrients released as the materials decompose. Mulching is also practical because you can recycle your garden waste while doing it.  Why do so many people pay their landscapers to haul away leaves and yard debris in the fall and then pay them again in spring to bring wood mulch into their beds?  It makes no sense.

Create a Bee-Friendly Garden

bees in flowers

Proper plant choice, nesting aids, and a strict no chemical policy can make creating a bee-friendly garden easy. Here’s how anyone can attract nature’s pollinators to their yard!

Why is a Bee-Friendly Garden Important?

“Without bees, there is no harvest” – that’s the simplest way to summarize the importance of bees for the environment. Wild bees and honeybees perform a large part of plants’ pollination, thus ensuring abundant yields and contributing to plants’ spread.

Wild Bees

Wild bees differ significantly from honeybees in several ways.  Honeybees are the imported bees that we humans have been propagating for many generations.  We typically raise them in hives, but sometimes they leave the hive and create new hives in the wild.  This would make them feral honeybees, but still honeybees nonetheless.

Wild bees are a much more solitary creature that, unlike honeybees, do not live in a hive but may live in the ground or rock holes, plant stems, dry stone walls, or insect hotels.  There are a great many varieties of wild bees, and we know much less about them than we do about our friends, the honeybees.

Because the wild bees are solitary and widespread, they have a higher pollination performance than honeybees. As a result, many plants flower better when pollinated by the more efficient wild bees. Some plant species, such as tomatoes, are pollinated exclusively by wild species.

 In addition to helping our flowers bloom and our veggies grow, bees also serve as food for many other animals and are therefore crucial for the ecosystem.

How Does a Bee-Friendly Garden Help the Insects?

If the nearest wildflower meadow is very far from the bees’ nesting site, they may have trouble reaching it. Therefore, a bee-friendly garden should contain everything they need to live: It should offer them food, nesting sites, shelter, and winter quarters.

Just a few bee-friendly plants in the garden or on the balcony create such flower islands and help the bees find food. This allows the busy insects to easily fly from flower island to flower island, pollinating more plants and supporting the ecosystem.  Picture a poor little bee flying around Manhattan looking for a flower.  The more we can create little bee oases, the more bee-friendly our world is.

Undoubtedly, protecting the bees is essential for the earth and our well-being. Let’s look at what a bee-friendly garden looks like and which plants you should choose.

How to Make Your Garden Bee-Friendly

You can transform your plot into a bee garden with straightforward means. Even a small corner with bee-friendly plants is an excellent start for the insects. If you put in a little more effort, you can get even more out of your garden: bee-friendly perennials, herbs, and shrubs will quickly turn it into a bees’ paradise.

Drinking facilities are also necessary for bees. Fill up an empty bowl with water and place a few pebbles or marbles in it. This way, the bees can safely crawl in and out of it.  Better yet, create a water garden, fountain, or pond that your bees can visit.

No Chemicals

If you are looking for the one thing you can do to encourage bees and nature of all types to thrive in your yard, it is quite simple; DO NOT USE CHEMICALS! No chemical pesticides, no chemical herbicides, nothing.  I don’t care how many times the neighborhood mosquito spray guy or your landscaper tells you that the products they use are safe.  They are absolutely not safe!  Do not use them, ever!

Anyone who is applying these chemicals to your yard is trained by the people selling these chemicals to tell you what you want to hear so that you continue to buy more chemicals.  Their jobs depend on it.  Chemical corporations care about money, not bees.  They will hire any scientist who will tell them what they want to hear, so plenty of scientists are available to lie to us.

Build Nesting Houses for Wild Bees

To attract wild bees to your garden, you can build so-called insect hotels – Nesting houses. They offer all sorts of bees a nice place to nest and hibernate.

You can buy such a “bee hotel” or build one yourself. If you want to build one, all you need is some wood.  Build a wooden structure of any shape or size with lots of tiny holes for the bees to crawl into.

It is best to use hardwoods such as beech or oak since softwoods can easily crack and swell in damp conditions. You should also avoid resinous wood at all costs, as the resin can be deadly to insects.

Use holey wood or drill holes in the wood 3 mm to 10 mm in diameter and about 2.5 inches deep. Make sure to polish the edges of the holes so that the bees don’t harm their wings.

Finally, make it birdproof so that the birds don’t come and feast on your bees.  A piece of wire mesh with holes large enough for bees of all sizes but too small for a bird to enter will work just fine.

Bee-Friendly Plants

When looking for bee-friendly garden plants, the first thing you should look for is native varieties. Bees are used to these and have learned to adapt to them. Native weeds such as Dandelions, Creeping charlie, and Beebalm are excellent nectar sources for bees and other insects such as butterflies, beetles, and moths.

Also, when choosing a plant, avoid double flower plants. These lush flowers look beautiful but make it difficult for approaching bees to find food: they have to fight through numerous petals before reaching the stamens with little to no nectar or pollen. Therefore, these flowers are not very helpful for the bees.

An easy way to have bee-friendly flowers in the garden is to use seed mixes. However, many mixes include plants from the Mediterranean or other non-native regions. The flowers are usually quite suitable for insects, but regional plants are still a better choice for native wild bees. Ideally, plant mixtures that are ideal for the insects in your area. You can obtain such plant mixtures in your local nursery or other agricultural stores.

35 Bee-friendly flowers and perennials:

  • Anise hyssop/Agastache foeniculum
  • Astilbe, false spirea/Astilbe spp.
  • Bee balm/Monarda spp.
  • Bellflower/Campanula spp.
  • Black-eyed Susan, coneflower/Rudbeckia spp.
  • Blazing star/Liatris spicata
  • Butterfly bush/Buddleja or Buddleia spp.
  • Catmint/Nepeta spp.
  • Chrysanthemum (open types)/Chrysanthemum
  • Clematis/Clematis spp.
  • Common yarrow/Achillea millefolium
  • Coral bells/Heuchera spp.
  • Cornflower/Centaurea spp.
  • Fennel/Foeniculum vulgare
  • Foxglove or beardtongues/Penstemon spp.
  • Garden speedwell/Veronica longifolia
  • Globe thistle/Echinops ritro
  • Hosta/Hosta spp.
  • Hyssop (naturalized in North America)/Hyssopus officinalis
  • Large-leaved aster/Eurybia macrophylla
  • Lavender/Lavandula
  • Lupine/Lupinus spp.
  • Mints/Mentha spp.
  • Oregano/Origanum vulgare
  • Pentas/Pentas spp.
  • Peony/Paeonia spp.
  • Pincushion flower/Scabiosa caucasica
  • Rosemary/Rosmarinus officinalis
  • Russian sage/Perovskia atriplicifolia
  • Sea holly/Eryngium maritimum
  • Stokes aster/Stokesia laevis
  • Sunflower/Helianthus
  • Swamp milkweed/Asclepias incarnata
  • Sweet alyssum/Lobularia maritima
  • Thyme/Thymus spp.

 Be Friendly to the Bees!

It’s no news that bees are in trouble.  Some varieties have been declining steadily for a long time.  Agriculture specializing in monocultures deprives bees of their habitat and food base.  Without bees doing a large part of the pollination, we would not have a functioning ecosystem.

We can all contribute to saving the bees by merely making our backyards a bit more bee-friendly.

A bee-friendly garden offers safe nesting, shelter, water sources, and a wide variety of food. This means an area free of deadly chemicals.  It’s not all about the bees; it’s about us.  We need to care for our earth, and these tiny little buzzing pollinators are a crucial part of our world.  Plant some pretty flowers, make your yard beautiful and help the bees.

How to Create a Child Friendly Yard

Planning the perfect landscape design for your property can certainly be a challenge.  You have many aspects to consider and a great many choices of materials and designs to choose from.  Designing a landscape for yourself is challenging enough, but what if you have children?  How can you create a child friendly yard?

This article will explore some of the do’s and don’ts when designing a child-friendly landscape.

Common Parental Questions:

  • Will the place be safe enough for them to play in?
  • What elements should I add to the property to make it more child-friendly?
  • Is it okay to have a water feature?
  • What if we have a pool or pond in our yard?
  • Do we need to fence the property?
  • Are those steps too dangerous?

Kids will be Kids

Children seem to have boundless amounts of energy to run and play.  It is in a parent’s best interest to give their kids a safe area where they can burn off some of this excess energy. Creating a safe landscape or modifying your landscape to make it kid-friendly doesn’t need to be a huge project.

Most landscapes are designed around the needs of the adults and aesthetic appeal.  There is no reason that we can’t have an aesthetically appealing landscape with excellent curb appeal and have it be child-friendly at the same time.

Consider the Age of Your Children

Your children’s needs will change with age, and at some point, they will be choosing friends and activities away from your yard, but while they are young, it is important to make your yard enjoyable for them.

Toddlers

When your children are toddlers and younger, you will likely be in the yard with them, watching them explore and guiding them to keep them safe.  It would be great to have a nice level lawn area with lush soft grass for them to play and explore.  You will want to be out there with them, so having this lush lawn area just outside the kitchen window where you can keep an eye on them if you need to run into the house is a great idea.

Also, having a nice comfortable sitting area in this play area with soft furniture is an excellent idea so that you can sit and read a book while they play, or maybe they can crawl up onto the lounge chair for a quick afternoon nap in the yard.

It is also nice to have sunny spots as well as shaded areas where they can get out of the sun.  Planting a shade tree might be just the answer.

When they are toddlers, it is nice not to worry about head and face injuries.  Because toddlers tend to fall quite often, it is nice to have space where they can run around and fall without causing serious injuries.  Concrete, brick, rocks, and sharp-cornered furniture or fire pits are probably not what you need for a toddler’s play area outside.  Creating a nice play area full of soft grasses and plants will allow for plenty of safe running and falling without a lot of bleeding and crying.  If this area could be somewhat enclosed with a border of shrubs or flowers, the kids will be more likely to stay within sight and out of trouble.

While a bit more problematic as far as keeping a toddler clean, a sandbox is a great place for little kids to spend hours digging, building, and playing in the sand.  Sandboxes need not be a big undertaking.  While not particularly attractive to adults, a mounded pile of sand in the yard would be loads of fun for kids.  Most people try to tuck the sandbox into a garden corner, near a playset, or under a tree to provide a bit of shade.  Sunscreen and sand don’t mix really well.  The sand can be bordered with logs or small rocks to help delineate it.

A Bit Older

As they get older and start to explore the property, it is up to you to make sure that they still stay relatively safe.  By this time, I hope you have explored the yard and any neighboring hazards with them and pointed out the potential danger areas.  As they are developing, it is relatively easy to teach them about danger.  Just like they need to know not to touch a hot stove, they need to know not to jump into a swimming pool or pond without supervision.

Many parents feel that a fenced backyard is the ultimate solution.  I don’t disagree that having set boundaries where the kids know not to go without telling you is a great idea. This can often be accomplished with rock walls or hedges and garden beds, and it doesn’t necessarily need to be a fence.  “Kids, stay in the yard” should be straightforward and easy to understand, so some type of border or delineation will be helpful.

How yards are bordered or delineated will often depend on your location and neighbors.  As the children grow, they are sure to make friends in the neighborhood.  With so many backyards connecting to each other, children’s play spanning several neighboring back yards is common.

Having an area that is a bit more wild and unkept might be a real plus for these young explorers.  A place protected by trees and tall grasses can feel a bit like being in the forest.  They can feel like they are out of parent’s grasp while still being in the yard.

Creating a semi-private area in the yard where the older kids can hang out that isn’t quite as supervised will be appreciated.  Older kids love having a sense of their own privacy and independence.

Create a Play Area

There is no shortage of playsets and jungle-gym-type equipment available for the homeowner.  Having a designated area for the kids to climb and hang and get physical might keep them from using your living room for these activities.

There are many playsets that can be purchased in pieces and assembled at home, or you could always design and build one with the kids to give them a sense of accomplishment and a lesson in carpentry.

But, if you aren’t the do-it-yourself kind of family, many companies will custom build and install a fantastic play structure in your yard with slides, climbing walls, rope swings, playhouses, etc.

Giving your kids a place to climb and explore also encourages physical fitness.  With the thousands of shows and video games available to today’s generation of kids, it is excellent for them to be introduced to physical activity at a young age.

A trampoline can also be added to the play area. Who doesn’t remember the excitement of jumping and flipping around on a trampoline?  Today you have many different types and styles of trampoline and are sure to find one that will suit your yard.  Don’t forget to consider installing one with a safety enclosure to prevent injuries.

Pools and Water

If the family wants to install a pool or water feature, it is important to consider safety.  Pools and water features of any type can be hazardous to children who have not been introduced to them by their parents.

You must set strict household rules about how and when it gets used if you have either.  For the pool in a neighborhood backyard, a fenced enclosure and safety cover are always a good idea.  If you are creating a pond, be sure that it has easily sloped or stepped sides so that non-swimmers could easily walk out if they ended up finding themselves in your pond.

Treetop Fun

If the property has big and sturdy trees, you can put them to good use by building a treehouse. The older kids will love it, and even the adults who are young at heart will enjoy reminiscing the memories of their own tree houses when they were little.

Large trees can also be a great place to install a tree swing or hammock. There is something soothing about swinging, in the shade of a big old tree in the yard has long been a favorite kids activity.

Create a Vegetable Garden

Kids young and old love to imitate their parents. TheThe little ones love “helping,” and the older ones, while they tend to fight it at first, can get a great sense of accomplishment through gardening.

If you are an avid gardener and have had veggie gardens in the past, then you know enough to guide your kids into the hobby.  If this is your first garden, learn with the kids and keep it simple and stress-free.  Find a sunny spot in your yard, create the bed, and plant. 

Keep it Enjoyable

Keep the rows wide and the plants few.  Seeds are cheap, so have the kids help you pick a fun assortment and get them in the ground.  The secret to this is to keep it easy.  If you pressure yourself for results and perfection, it can be stressful for you and the kids.  If you keep it light and fun, you can have a great time doing it, build some great memories, and maybe even eat a dirty carrot or two together.

Give them Space

If having them make a mess of your well-established garden is too much, consider giving them a space of their own to plant.  There is something magical for young and old about planting tiny little seeds and watching them grow into plants.  Plant some fun stuff like sunflowers, gourds, and pumpkins.  Plant some tasty stuff that they can eat right from the garden, like strawberries, cucumbers, and peas.  They will likely learn a thing or two about what rabbits like to eat also.

Some of the many things you can plant in your kid’s mini-garden are cherry tomatoes, carrots, cucumbers, and even watermelon and strawberries. You should also consider planting the smaller versions of the produce they like to make it easier for them to pick up and carry once the harvest season comes. Pulling up baby carrots from the ground will be a fun experience for your little ones. It will warm your heart seeing their face light up with the thrill of knowing that their garden is thriving.

Kids love to get their hands dirty,  so the easy, fun parts like tilling, planting, and harvesting will be their favorites.  The challenging part is the weeding for both kids and adults.  The long hours in the garden pulling weeds can be boring for the young ones, so don’t be overly critical about the weeds.  Keep it light.

Back to Your Roots

Gardening can bring kids back to their roots (quite literally); many of our ancestors grew food of one sort or another, and it is an experience that everyone should have at some point in their life. Gardening can teach them responsibility and help them understand how the environment around us works.  They will learn not only to care for their plants but also to care for everything else that is alive and thriving.

Being out in the garden working together is a great, low-stress time to talk about our environment, sustainability, the dangers of chemicals, etc., to make them more aware of our earth as they grow up.  It can also be a great time to hang out and talk about friends or activities that they are enjoying away from the family.

Teaching them how and allowing them the opportunity to grow their own food may well be one of their fondest memories of their time with you as they get older.  Teaching them where our food comes from and how they can grow their own will be helpful knowledge that will last a lifetime.

Create a Family Area for Rest and Retreat

By creating comfortable outdoor living spaces, you will be encouraging your children and your entire family to enjoy time outdoors.  Whether it’s a simple patio and picnic table or an outdoor kitchen and living room, a comfy place to hang out and unplug can be just what the doctor ordered for those nice weekends of rest and relaxation.

Making your backyard fun and child-friendly will encourage your kids to spend more time outside.  Having fun activities and comfortable areas where kids can gather outside might just make your yard the go-to place in the neighborhood. 

Sure, it will mean you will be providing more snacks, and you will be likely to have more noise and activity in your yard, but the peace of mind that comes with knowing where your kids and their friends are hanging out will be well worth the extra effort.

How to Control Algae in a Large Pond

Is your pond 6 ft. deep or deeper? Do your fish seem to be gasping for oxygen at the surface of the pond? Is there a lot of algae in your pond? Is it lifeless and stagnate? If you can answer “yes” to any of these questions, please read on. You have insufficient oxygen levels in your pond, and you will struggle to control algae in your large pond.

Ponds that are deeper than 6 ft. are often unable to produce enough oxygen at those depths. This lack of oxygen will lead to thick nutrient layers on the pond bottom.  These nutrients will encourage more algae growth.  The human’s knee-jerk reaction is to add chemical algae killers, which simply exacerbates the problem more than we even realize.

Algae control is essential for maintaining a healthy pond. Algae blooms may discolor water, further reduce pond oxygen, and can asphyxiate other life forms if present in significant quantities. Excessive algae growth typically signifies water problems and can make the water unsuitable for swimming, fish, and other animals.

Nutrient Pollution

Excessive nutrient pollution such as potassium, carbon, phosphorous, and nitrogen can originate from decomposing lawn clippings, fertilizer, septic systems, and farm runoff. For The most part, when you see a pond with an excessive algae bloom, it is the fault of the humans around the pond, not the pond.  The pond is simply reacting to the conditions we have subjected it to.

A pond’s health is all dependent on the ecosystem and the circle of life.  When we disrupt this balance, a pond’s condition can deteriorate rapidly.

Low Oxygen Levels

The bottom of the pond runs low on oxygen first. The decomposition of the debris on the pond bottom depends significantly on the oxygen levels at that depth.  The absence of oxygen kills the bottom-dwelling animals (worms, snails, mussels, etc.) and aerobic bacteria that help keep the pond clean. The loss of these tiny pond helpers will significantly reduce the pond’s ability to clean itself.

Nutrients such as dead algae, grass clippings, leaves, plant debris, and animal waste fall to the bottom of the pond continually, so if the process of decomposition becomes interrupted by lack of oxygen or chemical treatments, the pond water quality can deteriorate quickly.  This ever-thickening layer of nutrients will be the food for future algae blooms.

How to Increase Oxygen Levels

The best thing that we can do for a larger pond is to provide aeration. There are two types of aeration systems; bottom aeration and surface aeration.

Surface Aeration

Surface aeration is just like it sounds.  It is usually a floating electrical water pump that shoots water into the air.  This water shooting into the air picks up oxygen and falls back into the pond.  The action of this water flying up into the air and landing back in the pond will typically effectively circulate the top three or four feet of your pond.

Bottom Aeration

Bottom aeration is, again, just like it sounds.  We place an electric air pump near the pond, and we pump air down to the bottom of the pond using weighted air lines.  At the bottom of the pond, the air is pushed through perforated membranes of one type or another.  These membranes are called diffusers.  The diffusers create tiny little air bubbles that add oxygen to the bottom of the pond and circulate the entire body of water.  This is very similar to the bubbles coming up from the bottom of a fish tank—the same concept.

One bottom aerator will create a circular flow of water in the pond as the air bubbles rush to the surface carrying the colder deep water to the top, which causes the warmer topwater to flow toward the bottom.  The deeper the pond, the wider the water turnover area will be.  A shallow, long pond will require more diffusers.

This continual turning of the water column by pushing air to the bottom of the pond will help keep the oxygen levels high on the pond’s bottom.  ThisThis will help all of the bottom-dwelling animals and bacteria thrive, allowing them to be more efficient at decomposing and consuming our pond muck, which will help starve the algae of the nutrients it needs.

One note of caution would be that if you install a bottom aerator in a deep old pond full of muck, the aeration will turn over so much water and carry so much of the muck into the water column that it can kill fish and other pond animals.  When installing that new aerator, only run it for a few hours a day for the first week or so and then gradually increase the run time until you can safely run it 24/7.

Prevent Nutrients from Entering

Do everything that you can to eliminate runoff into your pond.  The less runoff that enters the pond, the less nutrients it will carry.  Of course, many ponds are strictly runoff ponds, so eliminating the runoff would be a real problem. 

To reduce the amount of nutrients entering a runoff pond, make sure to maintain a dense border of plant material around the outside of the pond.  The more plants that the runoff water runs through, the cleaner it will be when it reaches the pond.

If paved areas or a valley run into your pond, it is a good idea to provide plant-filled settling areas where sediment can settle out of the runoff and nutrients can be kept out of the pond.  Fast-moving water will carry many nutrients and heavy sediment loads, so it is a good idea to slow it down as much as possible.

Make sure to minimize any fertilizer sources, lawn clippings, leaves, twigs, road salt, or any other chemical that may enter your pond.  You can assume that everything uphill from your pond will end up in the pond, so use your best judgment and be careful.

Beneficial Bacteria

There are many different strains of beneficial bacteria that can be added to your water.  There are many liquid bacteria applications that are well suited to smaller ponds and weekly or monthly maintenance, but for larger, deeper ponds, once you get your aeration system working, you will speed the decomposition process by adding more decomposers (bacteria) to the bottom.  Look for sinking bacteria tablets such as Muck Buster or Muck off, which will sink to the bottom and give your decomposers a helping hand.

Whatever product you buy, make sure that it is entirely natural and chemical-free.  Just because a product may be labeled safe for fish does not mean that it is safe for your pond.  You only want completely chemical-free products.

With a natural bacteria product, you can never add too much, as the bacteria will be put to good work until the muck is so decomposed that there isn’t enough to support the bacteria levels. At this point, the bacteria will simply die off and be consumed by other water dwellers.

Plants

A straightforward and long-term solution to help keep your water clean is plants.  Lotus and lilies reduce direct sunlight and provide shade, which helps control algae’s growth. Submerged plants such as hornwort, parrot’s feather, and anacharis release oxygen into the water and compete for nutrients with the algae.  All marginal aquatic plants such as cattails, rushes, iris, reeds, etc., will compete for the same nutrients that the algae need to thrive.

A Problem With Plants

The more beautiful plants we have in our pond, the fewer algae we will have.  One trouble with this in large unlined ponds is that these marginal aquatic plants can really take hold and will often spread and overwhelm a pond in a number of years.

We need the plantings in our ponds to compete with the algae for the nutrients to keep the algae in check, but we don’t want them to overgrow the pond.  Often, this dilemma leads people to spray their pond with herbicides to kill off the plants.  This leads them into a vicious circle of chemical use and algae bloom, as every time they use chemicals, they are killing off beneficial pond life, and every dead clump of plant roots is now acting as fertilizer for the next algae bloom.  This is a never-ending, terrible situation.

A Few Solutions

So what can we do?  If you have pond plants overtaking your pond, the best solution might be to excavate or dredge them out.  This will remove the root mass and give you a fresh start.

Once you take care of that, you will be left with a pond that needs plants.  There are two ways to solve this problem that have proven very effective.

Floating Plant Islands

Floating plant islands can be purchased or built yourself.  The composition of the island isn’t as crucial as its function.  It must be constructed of a material that will float, supporting plant growth and letting the roots grow through into the water.  Most commercially available plant islands are made from recycled plastic and are a fibrous mat that is very buoyant and very porous.  This allows the island to support a significant amount of weight and allows the plant roots to hang down into the water.

These floating plant islands mimic the floating bogs found in nature.  The effectiveness lies in the fact that the plant’s roots are hanging into the water, soaking up nutrients.  The mat is just floatation; you don’t need to add soil because the entire point is to have the plants take nutrients from the water. 

The larger your pond is, the more coverage you will want.  These islands are ideal.  You get the benefits of plants in your pond without the disadvantage of having the plants spread throughout the pond.  The islands are usually roped to the shore in two places to keep them out in the pond or anchored to the pond’s bottom.

Foliage Removal

For the ultimate nutrient removal, you can cut the foliage from the plants at the end of the season and dispose of them so that the decaying plant material doesn’t add nutrients back into the pond.

Floating islands are increasing in popularity to improve water quality and provide an attractive focal point in the pond. Plants grow remarkably well on a floating island. The same vegetation planted on the shoreline near an island doesn’t grow nearly as well. Floating island plants grow bigger and healthier than plants along the shoreline.

Growing Wild

If you prefer to let your floating island grow wild, try a native garden. Depending on where you live, there may be local sources for plants and flowers. Your local garden center can help point you in the right direction. These don’t need to be all aquatic plants!  Depending on the type of island you install or build, you may be able to plant terrestrial plants that sit high enough to do just fine. Just don’t pick plants that like dry soil.  They need to like it a little wet. Choose plants that attract birds, bees, butterflies, and other species.

You can do whatever you’d like with these islands.  Get creative. As long as plants grow on them and roots hang into the water, they help control your algae and improve water quality.  You can plant the island to complement the existing landscape, grow a floating flower garden, zen garden, or create a specialty island of your design. 

No green thumb is required to grow an edible floating island. Grow any edible plant in your floating garden. Choose from edibles such as fresh herbs, fruits, vegetables, salad greens, or flowers. Planting it is simple and provides the perfect environment for natural and rapid plant growth with no pesticides or herbicides.

Floating Treatment Wetland or FTWs

FTW’s are very similar to standard floating islands but are typically larger and planted more diversely to allow for better habitat for other animals.  Are you looking for a natural way to cleanse your pond and a safe alternative habitat solution?  The FTW may be your solution.

FTW’s can be created to create habitat for waterfowl nesting, add shoreline protection, improve fish spawning, or greywater or stormwater treatment. There are many ways to make a beautiful and useful plant island. These are typically used in a larger, more commercial setting where greater stability and biodiversity are required.

The islands come in many shapes and sizes. The most common shapes are kidney, rectangular, or square. The islands can be joined together to make a larger floating island. The islands also come in circle shapes but are not as cost-effective as the other shapes.

The plants to use on your floating island will depend on the benefits you want to achieve from your island. Do you wish to beautify your pond, reduce algae, create a nesting island? Benefits such as nutrient removal, enhancement of habitat, the attraction of invertebrates, butterflies, or dragonflies can all be possible with one plant island, or you can create several different islands for differing effects.

Wetland Filter

Another great way to get all of the advantages of having plants in your pond without worry about them spreading is to create a wetland filter.  A constructed up-flow wetland filter is located outside of the pond.  A rubber-lined pit is lined with various-sized rocks.  Water is pumped from the pond into the bottom of the wetland filter, where it is forced up through the layers of rock.  The water then flows back to the pond via a waterfall or stream.

The wetland filter can be planted thick with aquatic plants.  The water getting pumped through the plant roots will allow the plants to absorb large amounts of nutrients to help control the algae in your pond.  Aquatic plants seem to absorb more nutrients and grow more quickly when in moving water, so the wetland filter creates super-charged aquatic plants.

Wetlands also help clean your water by helping to remove ammonia and heavy metals from your water and providing an excellent place for sediment to settle out of the water column.  Once again, to maximize water quality effects, the foliage can be harvested at the end of the season so that nutrients and removed toxins don’t re-enter the water.

 Understanding Algae and How to Control it in Your Large Pond

Many pond owners have a problem with algae but do not understand what they are and how they grow.

While most people don’t consider algae to be plants because they don’t have stems or leaves, they are very simple, primitive plants that use the process of photosynthesis, just like other plants, to take energy from the sun and combine water and carbon dioxide to form sugars for energy and growth. Algae also produce oxygen like other plants and absorb oxygen when there is no sunlight.

There are two common forms of pond algae.

  1. String algae, also known as hair algae, is a filamentous species that grow in long strands, adhering to rocks and waterfalls. They will eventually tangle together to form thick, unsightly mats that can double their weight within 24 hours.
  2. Green water algae are single-celled organisms that remain suspended in water. They are so tiny they can pass through even the finest filter. If there is plenty of sunlight and nutrients in the water, up to five million cells per milliliter of algae can be in the pond water.

Balance is the Answer

Balance is the best when it comes to controlling algae. No natural pond is ever algae-free, but it can be kept in check in a balanced environment. Understanding how algae grow is a good start.  Understanding that chemicals and sterilizing gadgets are never the answer is an even better start.

The realization that it is our job to simulate mother nature’s ways of creating balance and harmony in our man-made ponds is the step that many pond owners never grasp.  We should never fight with nature; we should step back, learn from nature and figure out how to allow nature to help us.

It sounds simple, yet it is so very hard for some.  Patience and understanding is the answer.  We often want a quick fix, so we grab a chemical, dump it in, kill the algae and think we are done.  We don’t realize the headache and never-ending battle that we have just started.  Using Mother Nature’s way through the addition of plants and bacteria coupled with some mechanical aeration, we can create a simple, long-lasting solution that will cost much less long term both financially and environmentally.

Don’t Be Fooled

Natural pond balance works for the control of algae. Don’t let anyone tell you otherwise.  Most pond companies will promote needless monthly chemical applications to maintain a pond. They are merely selling a product that will poison the water. If it is done the natural way, the pond will eventually do very well independently with no help from us.

When we use chemicals, it is a vicious cycle of killing algae with chemicals, and the dead algae go to the bottom, creating more nutrients for the next algae bloom when the chemicals wear off. This is what makes most natural bottomed retention ponds such a nightmare for their owners – chemicals and thick muck on the bottom of the pond.  Job security for the chemical application companies for sure!

Use natural means to control algae growth in your pond. The fish, insects, and plants will thank you – if they could.

Mimicking Nature

Using plant islands and wetland filters, we are mimicking the way that nature takes care of the natural ponds and lakes on this earth.  Working with mother nature is always easier than working against her.

A Pond is a Pond – Treat it Right

Whether you have a large backyard pond or are the manager of a retention pond or golf course pond, your hardships are often the same.  You want clean and clear water that is not thick with algae. If you have been trying to maintain this pond for a while, you are likely frustrated by the lack of simple fixes and the fact that most professionals will tell you that they need to apply chemicals weekly or monthly for eternity to control the algae.

I’m here to tell you that they are wrong, very wrong.  There are many simple and natural solutions to your pond troubles, and once you get your pond balanced and functioning as it should, your maintenance headaches will be eliminated.  Treat it right and it will do the rest.

Front Yard Landscaping Ideas

Curb appeal is important.  We always talk about making a good first impression, and the front of your house is many people’s first impression of you and your family.  Curb appeal is also vitally important when it’s time to sell your home.  While most people that I meet have many back yard landscape ideas, most aren’t as good at coming up with front yard landscaping ideas.

This article will try to pull together a few pointers to help you figure out just what to do with your front yard.

Where to Begin?

Where you begin depends on where you are right now.  If you are starting from scratch and you have a bare front yard, congratulations, and I hope that you are enjoying your new home.  But, if you are like most people, you already have a front yard landscape, and you think it needs an update.

I’ll run through my thought process on front yard landscapes, and you can jump in wherever you feel is appropriate for your situation.

The Vision

An excellent way to figure out what you want to do in your front yard is to look at some other examples.  One of the easiest ways to d this is by searching online for front yard pictures that you like.  This is very easy to do, and iunno time, you will likely have many ideas.

The second easiest way and probably better way is to drive around neighborhoods in your area and see what others have done.  Checking out the local front yards will help because you know that if they are doing it in their front yard, you can do it in yours.  It doesn’t help you to download a bunch of landscape pics with plants that can’t grow in your zone, so looking locally for ideas is often easier.

I am not suggesting that you copy anyone; I’m just saying that it is a great way to start putting together a list of features that catch your eye.  You can write down a list, but the easiest is probably to take a picture of the components that you like

Pat Attention to Specifics

Every house that you pass will give you a first impression.  Some will be good, and some will be bad.  When you come to a good one, take note of which aspect caught your eye.  Was it the way that the plants were placed?  Was it the curve of the front walk or the driveway’s style?  If you do this for a while, you will start to realize what you like.  Maybe you like brick curving walkways. Perhaps you like large trees bordering the house, or perhaps it’s the flower beds that catch your eye.  Whatever it is, figure it out.

This will be easier if you are looking at homes similar in design to your own.  Not that you can’t take ideas from any yard, but it will be easier for you to picture it in your yard if the house is of a similar design.

Looking it Over

Once that you have a bunch of ideas of which landscape aspects catch your eye, you need to figure out how to implement them in your front yard.

Standing Out in the Road

Stand out in the road in front of your house and lake a long hard look.  If you live on a busy street, it may be better to take a picture so that you can take time to examine the details without worrying about getting run over.

Which aspects of your front yard are appealing and which ones are terrible.  If you have a brand new house and have no landscape at all, the house will stick out like a sore thumb.  It will likely be very unappealing and might feel stark and bare.  If your landscape is twenty years old, it is likely that it is a bit overgrown and messy.

Many times, landscapers and homeowners alike plant for the moment rather than for the future.  They plant trees and shrubs that look good when they put them in, but ten or twenty years down the road, everything is growing on top of everything.  Many homes have trees that are obscuring their most attractive features, or they have large overgrown shrubs blocking the window and groundcovers growing over the walkways.

Clearing the Slate?

If you have a new home, you are likely starting with a clean slate, but if you have a mature landscape, you certainly do not.  A pet peeve of mine is that many landscape companies make it a standard practice to completely start over with a landscape.  They often suggest to homeowners that they tear it all out and start over.

Why would they do this?  Doesn’t it seem very wasteful to you?  It certainly is wasteful in most situations, but the new landscaper wants this to be an easy and profitable job.  If they wipe the slate clean, they can install one of their cookie-cutter designs that work on every house in the neighborhood. They get paid for all of the labor for tearing out perfectly good plants, and then they get paid for installing all new plants.  This is about profits, not about you or your yard.

Most of the time, starting with a clean slate is completely foolish.  Most of the time, some of the existing landscape is just fine, and we can plan around it.  I would only recommend clearing your front yard landscape as the last resort.  When you have looked at it from a few angles, and there is just nothing good about what you have in your front yard, and you plan to change way too many aspects to save anything, then you may need to wipe it clean, but this is rare.

Pick and Choose

Sometimes, with an old overgrown landscape, it helps to remove some of the obvious things that need to go.  By picking out some of the worst offending features and getting rid of them, you may be able to more clearly see what you need to do to move forward.

I want to caution you to consider the lifespan and value of any plant material that you may be thinking about removing.  Cutting down a mature tree is a big decision that cannot be reversed.  Trees take lifetimes to grow to maturity, so first, figure out if that tree can stay and be pruned before you decide to cut it down.  Pulling out some overgrown juniper shrubs that have been rubbing on the front windows for the last few years is a whole other story.

Some multi-stemmed, suckering plants, such as dogwood and lilac, can be cut right down to the ground, and they will grow again from the base.  These plants are very easy to rejuvenate and can often be re-used in a landscape.

Having landscaped for so many years, I can envision the re-worked landscape without removing the bad stuff first, but for a homeowner new to doing their own landscape work, uncluttering the front yard may be the best way to start.

The New Dream

Once you have some favorite aspects picked out and you have removed some of your old clutter, it is time to pull together the dream.  Plan out your ultimate front yard landscape without any concern for budget. Just plan your dream and price it out.  I find it easier to dream big and cut it back if need be rather than the other way around.  

Planning

As you plan out your new landscape, it will help you to walk up and down your street and in and out of your driveway a few times to get a feel for how the new landscape will look.  As you view it from different angles, inset the favorite aspects that you want to implement in your mind’s eye and try to get a feel for how they will affect the yard’s overall look and feel.

You will feel a bit silly at first, and it isn’t easy to do for many people, but it will help you get a feel for your new plans before you actually begin.

Things To Consider

When planning your front yard landscape, you need to consider certain things.  Landscapes are rarely only viewed from one direction, and they are very seldom viewed from above.  Having site plans drawn for landscaping is often a big waste of time and done only to make it easier on the landscaper and not the homeowner.

 I can’t tell you how many times I have seen homeowners surprised by their landscape layout because it looks totally different than what they thought they were getting from their plan they had seen.  Even when standing in the yard with the plan in hand, many homeowners couldn’t even tell you what goes where.

If you need a plant to keep your thoughts or your landscaper’s thoughts straight, that is fine, but I would highly recommend walking the yard and painting or staking out the major elements so that you can truly get a feel for them.  Seeing things in your yard and seeing them on paper are two entirely different things.

Perspectives

Landscaping is about flow, continuity, and contrast.  You want to draw a viewer’s eye in a way that gives them the overall best impression of your home and yard.  Maybe there is a part of the front yard that should be blocked, and maybe there is a part that should be highlighted. 

Framing beautiful windows with plants can be very attractive, but plants growing up over the window sills almost always looks ugly.  Plants softening the edges of hardscapes and blending different landscape features look great, while plants growing together and covering up key features just look messy.

For curb appeal, it should look inviting.  For large front yards, groups of trees blocking some of the house from the road with a winding driveway leading to the house may add intrigue, while a large, thick stand of brush in a small front yard will look unkept and will usually give a bad first impression. 

A walkway that flows from the front door toward the road looks inviting, while a yard where you can’t see the walk at all makes the front door seem to just stand alone in whatever bed or lawn might be in front of it.

Balance

Most tall houses look better, with some tall landscape plantings tying them down at the corners. In contrast, short houses look better with smaller plants.  Everything typically looks best in scale.  A huge tree up close to almost any home is a bit much, while a sizeable towering tree out in the yard might make it look more stately.

Think of your front yard as a piece of artwork.  Paintings usually have symmetry so that they don’t look really heavy on one side and light on the other.  Your front yard is the same.  If you have tall trees and a tall section of house on the left, then you will need something substantial on the right side to help balance it off.  It doesn’t necessarily need to be done with larger trees.  A fountain, a colorful and full garden bed, or some outcropping stone might help balance the look.   

Blank Spaces

Don’t forget about blank spaces.  Blank spaces in our landscapes are essential to add interest and contrast.  At a distance, extensive beds of green plants will just look like a green mass, even if they appear very different close-up.  Part of your job when designing the front yard landscape is to design so that it looks good from afar as well as close up.  Speaking of blank spaces, it often looks nice to break up huge blank walls with some plant material, tying the front of your house down into the beds with some layering from tall in the back to short in the front.

Lighting

Adding some basic low volt landscape lighting to your front yard will bring the place alive at night.  Don’t go overboard with lighting; a little goes a long way.  Also, lay it all out above ground and live with it a few days before you bury any wiring.  You want to be able to go out into the front yard at night and move the fixtures around to get just the look that you want.  Once you are sure that it looks right from the road and the lights aren’t shining in your eyes when you are inside the house at night, then you can bury the wires.

Take Your Time

Part of the luxury of doing your front yard landscape yourself is to be able to take your time.  Landscapers aren’t pressuring you to make decisions; you can decide at your own pace.  Take out a few things and add a few things.  Change the big stuff first.  If you are definitely changing the front walkway or steps, then get that part done and work your way out from there.  Plan a bit, plant a bit, and take a look at what you’ve got.  Don’t be afraid to move things around if they don’t feel right and continually back up to see what it looks like from the street.

With a bit of advanced planning, some research, and some design ingenuity, you will be able to create the front yard landscape of your dreams at a fraction of the cost of hiring it done.

Good luck and have fun!

DIY Herb Garden Ideas

If you are the type of person who enjoys using herbs when you cook and you are sort of a do it yourselfer, then you’ve come to the right place.  Creating your own DIY herb garden isn’t hard and we’ve got plenty of ideas for how you can create your very own. first of all, let’s discuss what an herb is. There are many types of herbs and herb gardens, all having different uses.

What is an Herb?

DIY herb garden ideas
what is an herb?

An herb is defined as a plant that is useful to humans. Not the same as a fruit or vegetable, an herb is valuable for a variety of reasons. An herb can be used for its flavor, scent, medicinal properties, or insecticide. Some are used in dyes for coloring or industrial uses.

Herbs have been used for many thousands of years in balms and teas to relieve physical conditions such as stress-induced illness or upset stomachs. Herbs are not only useful but attractive as well. Gardeners use them as borders along walkways, landscaping, and mixed in with shrubs and flowers. But they are most known for their use in cooking for the unique flavors they bring to food.

Spices are plants used in the same ways as herbal plants but come from tropical regions. Spices are challenging to grow. On the other hand, herbs can thrive almost anywhere that has a growing season. Herbs can be annuals, which are plants that live for one season. Or they can be biennials, plants that live for two seasons. Or they can be perennials and come back year after year.

Types of Herb Gardens

There are many types of herb gardens and many ways to use them. Each of them has its own charisma and character.

Kitchen Herb Garden

This herb garden will consist of herbs used as flavorings in cooking. Most are grown in containers but can be grown in the garden as well. This herb garden could contain the following:

  • Basil
  • Chives
  • Parsley
  • Oregano
  • Rosemary
  • Thyme

If you are just getting started, you might want to make it easy on yourself and get a starter seed pack.

Fragrant Herb Garden

An aromatic garden will comprise herb plants noted for their lovely fragrance. They can be used for aromatherapy, cut flowers, potpourri, or scented candles. It will contain herbs such as:

  • Lavender
  • Lemon
  • Scented geraniums

Herbal Tea Garden

An herbal tea garden is made up of herbs that can be brewed into tasty teas. It will include:

  • Anise
  • Chamomile
  • Hyssop
  • Mints

Medicinal Herb Garden

medicinal herbs

A medicinal herb garden will include herbs used for comfort and soothing, such as:

  • Aloe
  • Feverfew

Use caution when using herbs for medicinal purposes. Some herbs are helpful, but others can be harmful if ingested or misused. Check with your physician before starting an herbal remedy.

Ornamental Herb Garden

An ornamental herb garden is noted for its beautiful flowers and unusual foliage. This type of herb garden could contain:

  • Germander
  • Sage
  • Southernwood

The most popular type of herb garden design consists of different kinds of herbal plants used for cooking, fragrance, beauty, and soothing.

Ways to Grow Herb Gardens

Along with the many kinds of herbs that can be grown are DIY herb garden ideas for growing them. Many of these are perfect for the urban gardener or if yard space is limited.

Rooftop Herb and Veggie Garden

rooftop garden

If you are one of the lucky city dwellers with access to a rooftop, you can transform this space into an urban herb garden. Always be sure that your roof can support the extra weight of whatever garden you plan. Soil and water get heavy. A weak roof could fall in and create a real mess below.

As long as you are at it, why not plant some awesome veggies as well? A small fruit tree can also be grown on a rooftop garden. Fresh homegrown herbs and vegetables taste great, are healthy, and safe from chemicals. If you are short of space, a rooftop vegetable garden will provide the veggies you desire for your family.

Create an Herb Garden in Pots.

herbs in pots

You can plant almost any herbs and vegetables in garden containers. Choose large and deep pots. Avoid low-quality, thin plastic pots because they heat up quickly and have poor drainage. Do not use ordinary garden soil for growing herbs and vegetables in pots. Use a good quality organic potting mixture for productivity and the plants’ healthy growth. Protect the pots from direct sun using cloth or straw to help reduce irrigation requirements.

Hang your Herbs

hanging herbs

If space is tight or if you have a pergola, gazebo, trellis or even a nearby tree limb, you can create a hanging herb garden. You can use any type of hanging planter basket, or you can use the hanging baskets that garden centers use with the wire hangers connected to the edge of the plastic pot. Either way, fill the pots with organic potting soil, plant and hang. You will probably want to hang them low enough to make it easy to harvest your herbs..

Create Raised Beds

raised bed

A raised bed is a practical and stylish way to make a vegetable and herb garden. You will be able to grow many more plants compared with container growing and they will require less irrigation due to the extra soil. You will appreciate the height of the raised bed when it comes time to harvest or pull weeds.

Well-stocked hardware stores, home improvement centers, or online shops will stock raised beds for rooftop growing, or you can build your own using timbers. Just determine which one is best for your needs and fill it with a mix of soil. aged manure, and aged compost.

Create an Herb Garden in Planter Boxes.

herb seedlings

Flower boxes or planters can be used to create a vegetable garden. You can hang them on an existing railing or set them on the ground. Do use ordinary garden soil for the planter boxes. Use compost-rich organic soil or quality organic potting mix. If you are hanging these boxes, you’ll want to keep them fairly light, but if setting them on the roof, it is very similar to planting in pots.

Repurpose an Old Sandbox to Create an Herb Garden

When your children have outgrown their sandbox, make it into an herb garden. It not only looks decorative but provides plants with a good space to thrive. Just make sure that there are some holes in the bottom for drainage and fill it with some aged compost and soil.

Optimize Vertical Space and Create an Herb Garden Almost Anywhere

Using your space wisely will enable you to get the most out of it. Growing vegetables and vines, such as beans, gourds, squashes, and tomato varieties near walls, trellises and railings, provide support and enable them to climb upwards and save garden space. With a bit of creativity you can incorporate herbs into this vertical space using planter boxes or small pots fastened to boards that you can lean or hanging from ropes or small chains.

How to Build a DIY Vertical Herb Garden Planter Using Plastic Bottles

Materials needed

  • Plywood or boards cut to the size you want (we are hanging pots, so it must be sturdy)
  • Empty plastic bottles (2-liter water or soda bottles work great)
  • Small nails, staples or screws (to fasten the bottles to the wood)
  • Fabric or weed barrier (to keep soil from coming through drainage holes)
  • Plants
  • Potting soil
  • Sandpaper (if you want to smooth the wood)
  • Stain or paint (if you want to finish the wood)
  • Screws, wall anchors, etc. (whatever you might use to hold it to your wall)

This vertical garden doesn’t need to be hung on a wall. It could be leaned against almost any vertical structure like a tree, fence, railing, light post, etc. Wherever you put it, it needs to be sturdy and fastened. A large piece of plywood will catch a lot of wind and I’d hate to see your vertical herb garden end up flat on its face.

Follow these steps to construct your vertical garden.

  • Prepare the wood frame by cutting, sanding, and staining, or painting if desired. Get creative, it doesn’t need to be square.
  • Figure out where and how you will hang or lean and fasten this creation. Figuring it out now is much easier than after the pots are attached.
  • Cut the top half off of your bottles using a scissors or utility knife (when using a knife, always cut away from yourself and keep fingers out of the way).
  • Drill or poke some holes in the bottom of the bottles to ensure drainage.
  • Fasten the newly cut bottle planters to the wood using screws. Arranged them in a way that leaves room above each pot for the plants to grow. Try to get two screws for each pot, just to make them more secure.
  • Cut a small piece of fabric and push it down into the pots to keep the soil in the pots when you water.
  • Fill the bottles with the soil and plants. Leave a small space at the top, about ½”, so water will not overflow when the plants are watered.

That is all that is required to make your vertical herb garden. You can make your planter larger or fancier by making multiple columns and place them side-by-side along a wall to create a sophisticated, stylish design.

If you are not up for a do it yourself project, check out this cool vertical rack:

Balcony Herb Garden

shelf with herbs

If you’ve got a balcony and nothing else, you will need to create a balcony herb garden. You can certainly use many of the above-mentioned ideas, such as pots, planters, hanging pots and vertical boards, but probably the most common way to grow herbs an your balcony is by using a window box styled planter hanging from the railing. Something like this one. Adequate sunlight might be a problem for you if your balcony is shaded.

Patio Herb Garden

Creating an herb garden right on your patio or off the side of your patio is probably the most popular way to do it. Having fresh herbs right outside your door is super handy. You likely spend time out there already, so maintenance is easy and its likely not far from your kitchen, so harvesting is easy. If you are lucky enough to have a sunny patio or deck, creating an herb garden right there is probably your best bet.

Window Box Herb Garden

window boxes

If you don’t have a garden or yard, that isn’t a problem. Get some window boxes to grow your culinary herbs. They are an excellent option for growing herbs. They are easy to place, provide good drainage, and have access to sufficient sunlight as long as you pick a window on the sunny side of your house. Small varieties of herbs such as moss-curly parsley, basil varieties such as Genovese and Napoletano, leaf lettuce, and strawberries can easily be grown in window boxes.

Indoor Herb Garden Ideas

indoor herbs

Create a mini herb garden in your home to enjoy a fresh aromatic supply of herbs for your cooking, even in the winter. Use small pots and DIY containers to plant the herbs and place the pots in a bright, warm, sunny area. Not only will this improve the air inside your home, but these herbs continue to add fresh flavor to your cooking for a long time and with minimal care.

How to make a windowsill herb garden

You can use many small pots to grow specific herbs in each one, or you can use larger pots and grow several varieties in each. It sort of depends on your window sills. If you have tiny sills, you could always get a raised plant stand or put them on a countertop below a window to get the same effect. Keep in mind that you may want to take your herbs outside in the summer, so pots that are easy to carry around might be a good choice.

The container should be at least six to eight inches deep. Herbs have fairly shallow roots, but you need to leave some extra space for watering. The last this you need is overflowing pots in the house. Using larger pots will give plants like mint and thyme room to spread out and it will allow you to water less often. Make sure that you use pots with sufficient drainage and make sure that you have a way of catching this drainage. We don’t want to wreck your windowsills with water.

You should use good quality, light weight , organic potting soil like this stuff below which is make form coconut coir which i light and holds a lot of water

If you are starting from seeds, you might want to get a little seed starter kit to make it easier on yourself. Start the seeds in this kit and then once they get large enough, you just pop out the little plug, plant and all and put them into your larger pot.

Be Particular about the Herbs You Plant.

Make a list of herbs you use in cooking and consider the conditions in which they will be grown. If you have a tiny space, you will not be able to experiment much. Plant only the herbs you know you will use for cooking and that you know will grow in your conditions. If exposure to the sun is at least five hours daily, you can choose from basil, rosemary, oregano, cilantro, thyme, and sage. If exposure is less than five hours, plant fennel, parsley, chives, lemon balm, mint, and chervil for better results. Be sure to keep your herbs watered, but not overly wet and use an organic fertilizer as needed.

Harvesting

using herbs

The best way to encourage the foliage’s production and dense growth is to harvest the herbs regularly. Frequent pinching and picking of leaves promote the plants’ lush and healthy growth. Deadhead (remove) the flowers to stop the herbs from seeding to prolong their growing time.

General Growing and Planting Guidelines

An essential part of growing herbs is understanding how they grow. They are very much like any other vegetables you grow, with a few small differences.

Most herbs need four to six hours of direct sunlight for maximum growth. Ensure that you look at your planting space at different times during the day and note where the sunlight hits the space. Trying to get the best out of plants that don’t receive enough sun is not going to be fun.

Decide on Seed or Starter Plants

Some folks like to grow their plants from seed, and if you have children in the house, starting from seed can be an exciting and educational exercise. If you choose to start from seed, do yourself a favor and get a seed starter kit. These make seed starting very easy, just follow the directions.

If you are not up to the task of starting seeds yourself, feel free to buy starter plants. This makes for less set up and less mess. The plants can be planted directly into the beds, pots or planters that you will grow them in.

Harvesting

Harvesting your herbs is not difficult, but it’s best to harvest different herbs in different ways. Knowing when and how to harvest is important. When it comes to harvesting, not all herbs are the same. For example, if growing basil, be sure to snip leaves from the top of the plant instead of the bottom. Herbs like mint and oregano are harvested by snipping off the leaves anywhere on the plant. Chives can be directly cut down to soil level if desired. Do a bit of research to know how to correctly harvest your herbs to get the most out of each plant.

Take the Plunge

If you haven’t grown herbs before, I suggest you take the plunge. For the most part, growing herbs is easier than planting a vegetable garden. You can plant a nice little herb garden that takes very little care from you to grow. No matter where you live, there must be at lest one of the suggestions listed above that will work for you. Just pick one and go.

Some Beauty Tips

DIY Herb Ideas
herbs on the table

Most of what we have covered above is relating to growing herbs to eat. Did you know that many herbs are reported to have therapeutic advantages for our skin? They can help by improving the skin’s cellular firmness, coloration, and health.

Here are a Few Herbs that are Beneficial to Your Health

  • Chamomile – Chamomile contains alpha-bisabolol, a compound that can diminish the formation of wrinkles. It heals skin irritations like burns and acne. Chamomile can be used as a face wash or in tea to drink. But use with caution, as it may not suit everyone’s skin.
  • Calendula – Calendula is one of the most effective herbs for dry skin. It has anti-microbial, anti-inflammatory, antiviral properties, which considerably enhance the skin’s health. Carotenoids are present in Calendula. They are oil-soluble and work wonders for the skin. It heals inflammation, rashes, psoriasis, dermatitis, age spots, stretch marks, varicose veins, and warts.
  • Holy Basil – Holy basil is not the same as the more commonly known “basil.” Holy basil is a culinary herb with antibiotic and antifungal properties. It is also excellent for reviving dull-looking skin. It helps to soothe, heal, and rejuvenate the skin. As it is rich in antioxidants and Vitamins A and C, this herb destroys harmful free radicals and leaves you with beautiful skin.
  • Aloe Vera – Aloe Vera is called the “plant of immortality” because of the benefits it offers the skin. It has anti-inflammatory properties that can heal the skin. It deeply moisturizes the skin and can act as a protective barrier from environmental damage. It has beneficial enzymes that make it one of the best herbs for the skin. Aloe Vera treats blemishes, combats acne, and can cleanse dead skin.
  • Lavender – Lavender is used as a cure for eczema and acne. Lavender oil has a pleasing scent and is calming to the skin. It not only nourishes the skin but helps to eliminate bacteria. When bacteria penetrate deep into the skin, it causes pimples and flareups. Therefore, it is excellent for preventing and healing acne. The antioxidants and anti-microbial properties curb oxidative harm that causes the skin to age prematurely.
  • Ashwagandha – This is an alternative medicinal herb that is greatly beneficial for the skin. It is full of antioxidants that help eradicate free radicals that trigger dark spots, blemishes, fine lines, and wrinkles. It helps heal and prevent wounds and other skin issues with its anti-inflammatory, anti-microbial and antibacterial properties.
  • Cilantro – This is a unique herb with a strong aroma and one of the best herbal remedies for skin conditions. It is packed full of antioxidants, iron, Vitamin C, and beta-carotene. It provides soft and supple skin. It works to cure the outbreak of acne. It is also a fantastic disinfectant and detoxifier.
  • Parsley – Parsley is a miraculous herb as it balances oil production, prevents skin discoloration, and lessens inflammation. It fights acne and helps diminish fine lines and wrinkles.
  • Horsetail – This herb has astringent properties that can make your skin firm. It can help deal with acne and outbreaks. It has a high silica content, a collagen component, which keeps skin youthful and supple, making it an excellent anti-aging herb.

Commercial beauty products can sometimes cause more damage to the skin than benefiting the skin. To attain optimal skin wellness, choose natural options. They can heal skin conditions and provide you with a natural glow. Just to make sure, always consult your physician before trying something new.

Whether you will eat them, drink them, inhale them, or use them in your beauty routine, herbs are a versatile plant worth the effort to grow. There are many herbs for anyone of any taste. They are great for Mexican cooking, Asian cooking, and an absolute must for Italian cuisine. Grow some herbs today!

Happy gardening!

Balancing Hard and Soft Landscape + Bonus Tips for Small Spaces

You may have heard the words hardscape and softscape a couple of times but didn’t give them much of a thought until you began planning your landscape. Landscaping professionals primarily use these terms, so you don’t have to beat yourself up if you aren’t aware of them.  We are going to show you how to balance your hard and soft landscape and we will also give you a few tips for your small yard.

On another note, if you are on this page because you have finally taken an interest in beautifying your yard and you don’t know where to begin, you came to the right place. I will not only walk you through the differences between hard and soft landscaping but will also share some tips on how to balance them, whether you are planning to fix a large or a small garden.

Differentiating Hardscape from Softscape

Hardscape and softscape are the two main elements that make up different types of outdoor living spaces. They are quite different from each other, but both are necessary to maintain a relaxing and beautiful garden. To identify them, always remember that the hardscape is inanimate while the softscape is alive.

Are you still confused? Read on for an in-depth explanation of their features.

Hardscape

hardscapes

The hard stuff you’ll find in your yard or garden is called hardscape. These are the gravel, stones, retaining walls, decks, driveways, gazebos, patios, outdoor kitchen, etc. They can either be naturally existing or human-made.

Even though they are called “hardscape,” some of these elements are movable. For instance, the stones, paving, and gravel can be placed anywhere you see them fit. This is also why they should not be considered an afterthought of an incredible landscape.

These hardscape materials are essential in separating the garden from the rest of your property. Depending on their placement, they can also improve your water flow and drainage, prevent soil erosion, embody your landscape’s overall theme, and many more.

As you plan your landscape, hardscapes should be your priority since they make up the bulk of your landscape materials, and they create the backbone for your softscapes.

Softscape

softscapes

If the hardscape is composed of the solid, non-living materials found or built-in your yard, softscape is the exact opposite. They feature the living part of your landscape like horticultural components such as shrubs, trees, flowers, grass, mulch, dirt, and others.

Since these are living elements, they evolve and frequently change as they adapt to the region’s climate. They are also literally soft to the touch, unlike hardscape materials.

Many times, landscape novices are confused about how to label ponds, fountains, and similar structures because they seem to contain both hardscape and softscape. That’s the beauty of landscaping. Although these structures are built using hardscape materials, they can also be considered part of the softscape because of the plants used to tie them in and beautify them.

The Purpose of Hardscape and Softscape

balancing hard and soft landscapes
purpose of hardscape and softscape

Hardscapes

  • Hard landscaping serves as the foundation of your whole yard. You can only start improving your garden once these hard features are established.
  • Hardscape ensures that you won’t have a problem even if it rained or snowed heavily. Through the correct use of draintiles and irrigation, which are primarily hardscape elements, excess water can be moved out of your yard or brought to your plants. Thus, you can utilize your outdoor space without worrying that there are puddles of water everywhere, and you can ensure that your plants will survive the dry times of the year.
  • Hardscape surfaces also provide the added benefit of preventing soil erosion.  Rock and stone are great for protecting our ground from erosion. 
  • Hard landscape provides hassle-free access to your home through the use of driveways, patios, decks, and walkways.
  • Hardscapes such as pergolas, gazebos, and trellises can help protect you from the sun and give you a nice protected spot to read a book.
  • Hardscapes can be used to create an outdoor kitchen, dining area, or even a fireplace.

Softscapes

  • Softscape is the soul of your yard. This offers you an avenue to be creative.
  • Like hardscape structures that improve water issues in your yard, softscapes can be used in much the same way.  Different plants are suited for different soil types and moisture levels, and plant roots and foliage can do a great job of protecting our soil from erosion.
  • Softscapes provide your yard with cool air. You’ll surely enjoy lounging outside under the shade of your trees.
  • If you choose edible plants like herbs, you’ll never run out of fresh produce.
  • The most critical role of softscapes in your landscape is to blend and soften the edges.  Plants can be used in so many different ways to soften your yard’s look.  What would a patio or retaining wall be without that cascade of beautiful flowers?
  • Softscapes are what helps us to keep this earth in balance.  The more live and lush plants we have growing in our yards, the more we help our planet! Check out this article.

Importance of a Balanced Landscape

balanced flower garden

There should always be a balance between the soft and hard elements in landscaping. We should refrain from going overboard with either feature because doing so will prevent us from achieving the effect we are aiming for. 

How many times have you seen a yard which looks like a commercial property? This is probably because of too much hardscape. Similarly, you must have seen a garden that resembles a jungle. The problem? Excessive soft landscaping!

By striking a balance between the two, you can create a welcoming and nurturing space for you and your family to enjoy for many years to come.

How to Balance Soft and Hard Elements in Landscape Design

balancing hard and soft landscapes
  • Tip #1: Identify the function of the area. If small children and pets are going to hang out in your yard, you should make it safer by focusing on the softscapes. Meanwhile, if the area is outside an office building, you might want a more formal and rigid look with hardscape elements such as benches and walkways.
  • Tip #2: Avoid extremes. Do not overly decorate your landscape with shrubs, plants, trees, etc.  Many people overplant when they first landscape, which leads to overgrown beds and plants growing into one another.  Learn about your plants and space them according to their growth potential. On the other hand, do not cover your yard with stonework; it will feel cold,  uninviting, and industrial.
  • Tip #3: Consider water flow. Always keep in mind that mother nature will do what she will do.  Make sure that all of your hard surfaces are pitched away from your house, and don’t plant or hardscape where you might block drainage out of your yard.  The last thing you want is an unwanted puddle or a wet basement.
  • Tip #4: Prioritize water conservation and ease of maintenance. Choose plants resistant to droughts like Geranium, Lavender, and Aloe. Choose plants that are well suited to your growing zone and well suited for the sunlight and moisture levels that occur naturally in your yard.  Well adapted and well-planted softscapes will also be low maintenance.
  • Tip #5: Pay attention to quality.  Hardscapes can be forever if they are correctly installed, but a poorly installed hardscape can fail in a short time.  Base preparation is the most crucial factor in any hardscape, so pay attention to the details.

Hard and Soft Landscape Considerations for Small Spaces

techniques for small spaces

People with limited yard space often find it challenging to balance their hardscape and softscape. As a result, instead of building an outdoor oasis, they create a chaotic outdoor space that isn’t exactly livable.

Is there hope for these small outdoor spaces?

Of course, there is! Here are some ways to maximize your small yard through the proper ratio of hardscape and softscape.

Hardscape Techniques for Small Spaces:

  • Utilize vertical spaces through building pedestals and raised planters. These are great ways to economize space.
  • Put pavers around corners to create the illusion that the yard is extended.
  • Use low retaining walls as a planter holder or an extra sitting area.
  • Create an area that will serve as the focal point of your whole landscape. For instance, put concrete accent stools where one can rest.

Softscape Techniques for Small Spaces:

softscapes for small spaces
  • Put plants in the vertical spaces you made to draw people’s attention upward.
  • In planting, position bold-colored plants upfront. This will surely get the attention of whoever will see your landscape, and the small space beyond will no longer be noticeable.
  • For some reason, growing big tropical plants can make your backyard look a little bit larger. You might want to consider them, especially those with unusually shaped leaves.
  • Be sure to have the large plants at the perimeter of your yard.  Large plants can quickly fill and overwhelm a small yard.

Final Thoughts

Hardscape and softscape are the two fundamental elements of landscaping. One cannot go without the other, so you must understand how to create a balance between them.  Avoid focusing on one element too much.  Chances are, you are better at visualizing or installing one or the other.  You need to learn to focus on both aspects to create that well-balanced oasis that you have been hoping for.