How to Grow Kiwi in a Home Garden?

Kiwi Fruit on the vine

Kiwi is considered one of the most delicious and nutritious fruits that can be grown in the home garden. Kiwi plants develop tons of kiwi fruit on vines. The only thing that will bother you in its growth and development is its long duration to reach maturity. 

Kiwi plants take 7-8 years to start bearing fruit, so you should consider this a long-term investment. Everything you choose for this plant, from site selection to fertilization, should be accurate and optimal to make the most of this long-term commitment. 

Quick Facts about the Kiwi plant:

  • Kiwi vines start bearing fruit after 6-7 years of growth.
  • It requires the most well-drained, sandy loam soil. 
  • Kiwi is a dioecious plant, having separate male and female plants 
  • One male plant is enough to fertilize up to 6 female vines.
  • It requires a sturdy support structure to grow its vines.
  • Kiwi plant does not grow true-to-type, which means that you will purchase and plant a grafted kiwi plant. 
  • It produces fruit on new growth; therefore needs to be pruned annually, in Jan or Feb.

How to Grow Kiwi Fruit in the Home Garden?

You will start by selecting the Kiwi plant variety, and then site selection, soil preparation, and planting will be done as the final step. Let’s start with the kiwi plant variety selection. 

Kiwi Fruit Variety Selection:

There are three types of kiwi fruit that can be grown in a home garden:

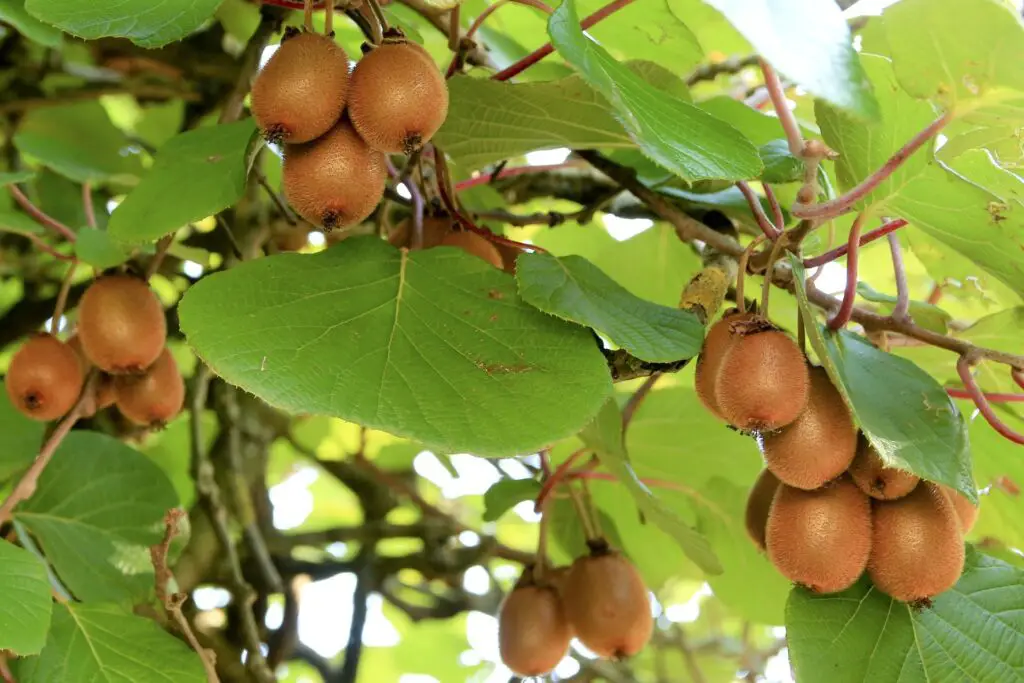
  1. Common Kiwi (Actinidia deliciosa) – This is one of the most delicious kiwi fruits that is consumed fresh. You will find it in grocery stores. It is a brown, thick-skinned fruit having green pulp. It thrives best in the USDA zones 7-9 and requires about a month of cool temperatures (between -1 to 7 degrees Celsius). 
  2. Golden Kiwi (Actinidia chinensis) – This Kiwi is also edible and sweeter than common Kiwi but less fuzzy and has yellow pulp. It thrives best in the regions where the temperature in winter goes as low as -12 to -1 degrees Celsius. 
  3. Kiwi Berry (Actinidia arguta) – This Kiwi is named for two different kinds of kiwi fruit; Hardy Kiwi (Actinidia arguta) and Super Hardy Kiwi (Actinidia kolomikta). It is much smaller in size and has thinner and smooth skin. 

How to plant Kiwi Fruit in a Home Garden?

It is planted in Jan or Feb when the fear of frost has passed. Being a vine plant, it needs plenty of space and severe pruning each year to get fruit from it.

You will need to plant at least one male and one female plant for them to bear fruit. You can plant more than one female depending on the space available, while one male plant will be enough to pollinate 5-6 females. Some self-fertile kiwi plants are available in the market, but they may be a bit costly. 

Site Selection

Although it can be grown in the open in sub-tropical or warmer regions, kiwi fruits demand a warm, sheltered, sunny spot, especially against a south or west-facing wall. 

  • In the spring, young shoots are particularly susceptible to frost damage and need protection.
  • Kiwi vines produce the best growth and fruit in sunny locations.
  • Place your plants in a safe section of the garden to prevent wind damage.
  • In colder climates, place the vines on the north side of the yard to reduce the possibility of freeze-thaw damage in the early spring, when plants are particularly vulnerable.
  • Kiwi plants need well-drained soil since too much moisture might cause their roots to rot.
  • Kiwi vines require strong support since they grow slowly. 
  • Build a tall, sturdy trellis structure that can support vines that can reach a width of 15 feet, a length of 20 feet, and a fruit production of up to 100 pounds.

Planting

  • Planting both male and female kiwi plants will ensure a strong crop. The females produce the fruit.
  • According to experts, one male plant should be present for every six female plants.
  • Vines should be spaced 10 to 15 feet apart.
  • If the roots are too lengthy upon planting, you might need to cut them.
  • Plant vines just deep enough for the soil to surround the roots.
  • At the time of planting, water thoroughly.

Care and Maintenance

  • In the height of summer or other dry times, give the plants additional watering unless it has been raining.
  • During the first year, avoid fertilizing. Afterward, fertilize in the spring with a well-balanced fertilizer or soybean meal.
  • If not in bloom, prune the lateral growth two or three times during the growing season.
  • Kiwis grow flowers and fruits on a 5-7-year-old plant
  • Regularly remove water sprouts (which are robust shoots) that grow from older wood, as well as shoots from the trunk.
  • When the plant is dormant, especially in the winter, it is the perfect time to prune female vines. On the other hand, the ideal time to prune male vines is when the plant has finished flowering or come out of the blossom period. 
  • Cold climates are unfavorable for kiwi plants, especially young ones; therefore, they need to be protected from frost.

Alternative Way To Grow Kiwi Plant In Home Garden

Other than seeding, Kiwi plants can also be grown by the “Propagation Method.” Softwood cutting will be better, and grafting and layering methods are preferable for propagating the kiwi fruit. However, if you are not an experienced gardener, you should buy prepared cuttings of male and female kiwi plants. 

Spring season is the best time to plant the kiwi plant cuttings because they need warm weather and soil to grow properly. 

In addition, spacing the male and female plants almost 3-4.5 meters will be the best to let the individual plant grow and spread sufficiently.

Harvesting Kiwi Fruit

The correct harvest time is very important for kiwi fruit. Hardy varieties have more chances of bearing fruit earlier; however, a long summer and autumn (September to October) also play important roles in fruit maturity. 

The best way of harvesting the kiwi fruit is to pick the fruit before the first frost and place them indoors to ripen properly.

You will know that your Kiwi are ready to eat when a gentle squeeze reveals it to be a bit soft. It may take several weeks for your fruit to reach this stage. 

How to Store Kiwi Fruit?

  • Fresh kiwi fruit can be refrigerated for 5-6 weeks to be consumed as raw
  • Freeze the whole kiwi fruit and store it in plastic bags

Pests and Diseases of Kiwi Plant

Being hardy, the kiwi plant is resistant to common fruit pests. However, there are certain environmental factors, such as nutritional imbalance and waterlogged conditions, that may lead to the attack of the following diseases such as: 

  • Root rot 
  • Phytophthora crown rot 

FAQs:

Can I use kiwi fruit in gelatin recipes?

No. the reason is that the kiwi fruit contains a protein-digesting enzyme known as “Actinidain” and cannot be used in recipes with gelatin products. The enzyme will start digesting the proteins in the dishes and will not let the liquid recipe solidify. 

Can I grow kiwi plants in pots?

Yes. Kiwi plant grows into long vines, which means that they require space and support to grow sufficiently. You can grow kiwis in pots or containers of larger sizes but always remember to stack them appropriately and space them sufficiently.

What is the best fertilizer for a young kiwi plant?

The best fertilizer is compost or other organic fertilizers such as vermicompost, leaf litter, etc. However, in the month of fruiting, the plants may need a quick nitrogen source which is provided in the form of ammonium nitrate or urea (10-10-10). 

How To Grow Mulberry In Your Home Garden

mulberries in the hand

Do you like minor fruits? Mulberry is the queen of minor fruits for its delicious, nutritious, and juicy palatability.

We will describe the best way to have an easy-to-care-for and successfully fruiting mulberry in your home garden.

Because of its difficult-to-harvest and massive fruit-producing habits, people usually hesitate to grow Mulberry in their home garden. Moreover, it grows too tall, making it problematic to trim the tree easily. However, Mulberries can be planted against walls if space is restricted since they can tolerate various soils.

Quick Facts about Mulberry

  • Common Name – Mulberry tree, Red Mulberry, White Mulberry, Black Mulberry
  • Botanical Name – Morus spp.
  • Plant Type – Deciduous tree
  • Mature Size – 30–60 ft. tall, 20–40 ft. wide
  • Sun Exposure – Full, partial
  • Soil Type – Rich, moist but well-drained
  • Soil pH – Mildly acidic to neutral
  • Bloom Time – Spring
  • Flower Color – Yellowish-green
  • Hardiness Zone – 4–8 (USDA)
  • Native Range – North America, China
  • Toxicity – Leaves and unripe fruit are mildly toxic to humans

Growing A Mulberry Tree in Your Home Garden

A mulberry tree is equally attractive for humans as well as birds (masses of messy guests!). Furthermore, it has the habit of becoming invasive, which is why it is typically not well suited for small confined spaces and will be happiest when grown in large rural landscapes versus tiny postage stamp-sized yards. 

Despite its spread and messy growth habits, the fruit of the Mulberry has many advantages. It can be grown for human consumption and used in freshly baked items, juices, jellies, and jams, and a wide variety of animals will take advantage of the bountiful fruit it produces. 

Mulberry Tree Variety Selection

Choosing the correct variety of mulberry plant for your yard will be of key importance when first starting out with mulberries. Selecting the appropriate variety and growth habit will make the rest of your experience that much more enjoyable.

White Mulberry (Morus alba tatarica)

White Mulberry was imported from China for silkworm production and is not native to America. Although the white Mulberry has adapted to grow on many soil types, including sandy soil, rich loamy soil, silt loam, and clay loam, it will require moist, well-drained organic-rich soil for optimal yield. 

People love to grow white Mulberry in home gardens because of its flexible soil-acceptance nature and high tolerance; it is flourishing in many places.

Red Mulberry (Morus rubra)

Red mulberries are native to North America and hardier than black mulberries. They demand deep, organic matter-rich soils (found near streams and bottomlands). 

Red Mulberry can be grown from seed without stratification (a cold period) and planted in summer or fall. It can also be planted in the spring following 30 to 90 days of stratification in the refrigerator. 8 to 12 inches should separate the seeds before planting them. Trees will produce fruit in 4 to 10 years.

Black Mulberry (Morus nigra)

Black Mulberry bears the most flavorful berries compared to the above two types. It is native to western Asia and thrives best in USDA zones 6 and 7. 

It produces tart mulberries with a shorter shelf life; therefore, the fruit traders do not prefer to sell it, reserving the black Mulberry for leaf harvesting only. 

Dwarf Mulberry

While the above-mentioned Mulberry plants get quite large and can quickly overtake a small yard, there are dwarf varieties of the Mulberry that will top pout at maybe 15-20′ tall rather than the standard 50′ tall. Still, these are also hard to predict as some seem to stop at around six feet while others will grow to 20 feet.

Propagating Mulberry Tree in Home Garden

You can easily plant your mulberry tree by propagation. For that:

  1. It is propagated by soft-wood cutting. Take several branches almost 4-5 inches long and with a sharp pruner to avoid damaging the remaining branches. The bottom cut should be close to a bud so that the chances of the emergence of roots will be more rapid
  2. Be sure that each cutting should not have more than 2-3 leaves, and dip the bottom end in a liquid growth hormonal mixture for a few seconds 
  3. Make planting holes with a wood stick to avoid misplacing the applied hormone at the bottom end of the cutting and gently pat the soil around planted cutting to remove excess air bubbles
  4. You can plant more than one cutting in the same container until they have sufficient distance between them (the leaves of two cuttings should not touch each other)
  5. Cover the container with plastic for between humidity and temperature maintenance and protection from birds
  6. Do not place the container in direct sunlight; however, it should receive bright, sufficient sunlight for growth and development
  7. Mist the container regularly and be sure that the soil does not get dry
  8. When cuttings show 1-2 inches of growth, you can remove the plastic to let the cuttings acclimatize to the surrounding temperature 
  9. After 3-4 weeks, dig out the cutting to check the root development to transplant them into the soil

Growing Mulberries from Seed in Home Garden

Growing Mulberry from seeds is a cheaper way of planting it home garden. For that:

  1. You will collect almost 1 pound of mature, fully ripened mulberries at the end of the season
  2. Soak the berries in water for 24 hours, drain the water, and mash them to expose the seeds; collect the seeds and put them on a plastic sheet to dry. Place the seeds in the refrigerator for 60-100 days; it is known as stratification 
  3. At the end of the 60 to 100 days, prepare a tray with an equal blend of soil, peat, and perlite to sow the seeds.
  4. Sow the seeds as near the surface as possible because seeds sown too deep will not be able to come out and die there. 
  5. Make the soil moist before planting the seeds. Keep the seeds at 86 degrees Fahrenheit for eight hours during the day and 68 degrees Fahrenheit for sixteen hours at night.
  6. Provide the seeds with sunlight for at least eight hours each day. Every day, check the soil moisture and water as necessary.
  7. The live, viable seeds will germinate in the coming 14 days. Plant the seedlings in soil or containers soon after they have developed sufficient roots
  8. After 12-24 months of germination, the seedling will be strong enough to transplant to the permanent place

Mulberry tree Care Tips 

If you have selected the climate-compatible mulberry variety, you will not need to worry much about caring for and maintaining it because it will be resistant to many insect pests, diseases, temperature fluctuations, etc. 

Following are some of the most essential things to be kept in mind while planting and growing a mulberry tree in your home garden:

  • Although Mulberry is drought tolerant, regular watering will be better for a healthier and happier tree
  • It does not require heavy doses of fertilization, but a light dose of urea (10-10-10) will be best for a healthier plant and sufficient fruit bearing
  • Morus alba “Chapparal” is a seedless mulberry variety; best to grow in the home garden
  • It is a fast-growing plant that spreads its roots far away and keeps growing straight until controlled by cutting back the tree. Therefore, be aware to plant it far away from a structure such as garages, ponds, sewage lines, etc. 
  • Morus alba “Kingan” is a drought-tolerant mulberry variety; best to grow in dry regions where frequent watering is difficult. 

Growth Requirements Of A Mulberry Tree Grown In Home Garden:

Following are the necessary facts to consider while planting the mulberry tree and maintaining its health yearly.

  • Light – Both “full sun and partial shade” are favorable for mulberry trees, while some of the varieties of Mulberry yield more fruit when provided with sufficient and more light. 
  • Soil – Mulberry trees can tolerate clayey, loamy, and sandy soils as long as the soils have and maintain adequate drainage. The trees may survive in a variety of pH conditions (from neutral to slightly acidic).
  • Water – To aid in developing a robust root system, water your mulberry tree deeply and frequently after planting (two to three gallons per week for the first year is the best practice). Once they are established, mulberry trees can withstand short periods of drought, but extended dry spells can reduce fruit production or cause the unripe berries to fall off early.
  • Temperature and Humidity – Most mulberry trees can withstand temperatures as low as “-25 degrees Fahrenheit” during dormancy, depending on the species. Areas with climatic temperatures ranging between 68 to 86 degrees Fahrenheit will not be favorable for developing fruit.
  • Fertilization – Although Mulberry can survive without additional application of fertilizers, light doses of organic fertilizers before or after fruiting will help the tree to restore the nutrients it has given you in the form of mulberry fruits.  Note: Use a balanced 10-10-10 combination and 1 pound of fertilizer for every inch of the trunk’s diameter and once in late winter (end of Jan or start of Feb).

Conclusion

Overall, the Mulberry is an easy-to-grow and abundant fruiting plant that does best when it has a great deal of space to spread and grow. If you are limited on space, you will need to be vigilant with your pruning methods to keep this plant viable for your yard, and it would be advisable to start with a dwarf variety in this case.