
Waterfalls and streams are very different water features, but they have more in common than differences. These are the magic parts of a water feature, and these are where the water comes to life to delight us and any other animals that live nearby.
The construction of both is similar but not quite the same, and their reasons for being are similar but not quite the same. These are often the most difficult, time-consuming, and creative parts of building a water feature. This article will give you some tips so that if you decide that you need a waterfall or stream, you will know the difference and know which you want.
This article assumes that you already have a pond of some sort.
Table of Contents
Why Should I Build a Stream or Waterfall?
Ponds are wonderful ecosystems filled with life. One of the key ingredients to having a naturally balanced ecosystem is water circulation. In nature, larger bodies of water are circulated by animal movements, wave action, springs, and runoff water entering.
Backyard ponds are often too small to get much wave action and often don’t have springs or any watering entering them. This all too often leaves them somewhat stagnant. The addition of a stream or waterfall can give them the water circulation that they need to balance themselves out and improve water quality.
Waterfalls and streams also give us the added benefits of the sights and sounds of splashing and running water. Nothing attracts animals (humans included) quite like running water.
The Similarities and Differences Between Streams and Waterfalls
Similarities
- Both need flowing water
- Both need some grade change so that the water will run downhill.
- Both will be lined with some type of liner. Typically rubber, but it could be any number of waterproof, flexible liners.
- Both will be lined with rocks and river gravel to make them look natural and to protect the liner.
- Both will have water pumped into the end furthest from the pond so that it will flow back into the pond.
Differences
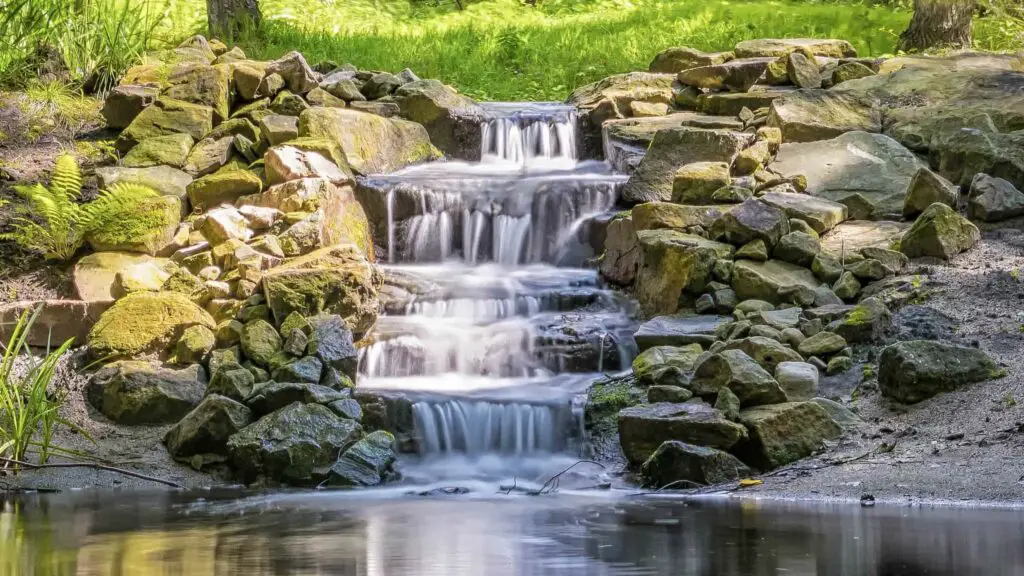
- A waterfall will typically have cascades or drops in level so that the water drops down levels.
- A stream will be relatively flat and will usually twist and turn to give the moving water some interest.
Basic Materials Required for both Waterfall and Stream Construction:
- Water pump
- Pond Liner
- PVC Glue
- Decorative Rocks
- Piping
- Connectors
- Pond Gravel
- Underlayment Fabric
- Pond Foam
- Dual-Walled Plastic Culvert
Waterfall or Stream Construction
Building a waterfall or stream onto your backyard pond is not a very technical or difficult task, but it does take some practice and creativity to become really good at it. Many people will build several of them before they feel confident in their abilities. I’ll take you through the steps you can take to build your own.
First, there are some rules that you must keep in mind:
- Water always flows downhill – This one seems easy, but you need to keep it in mind through the entire process.
- Water must be kept inside the liner – Again, this sounds basic, but I see this part messed up all of the time.
- Never twist heavy rocks on top of the liner – This will create holes that will allow the water outside the liner.
- Avoid having folds of liner or rocks that will divert the water over the edge – This again seems like it might be too basic to mention, but it happens all of the time.
- Electricity and water do not mix – Don’t get into ponds with pumps running in them. Failure of the pump or the electrical outlet while you are in the pond, could result in electrocution.
Before you Begin:
Location Planning
This is probably the most important step. Waterfall and stream construction is expensive and hard work, so it would be great to get it right the first time.
Consider the layout of your pond and its relation to the viewing area. The ideal situation would be that you have a hill on the side of your pond that is furthest from the viewing area. The viewing area is most likely the house, but if not, then wherever you will most likely be viewing the pond.
A hill on the backside of the pond allows us to build a waterfall or stream without needing to move a bunch of dirt, so it makes our lives easier. Unfortunately, this is not usually the case. Most ponds that I see are situated in a flat area. It is okay if this is the case; it just means more work for us.
We need the water to run downhill, and we want it to run toward our viewing area so that we can see it. Installing a waterfall or stream where you can’t see it is still very beneficial for the pond, just not as beneficial for you.
The ideal setup is a pond with a small hill behind it and an electrical outlet on the opposite side of the pond from the hill. This will allow us to build our stream or waterfall on the backside of the pond and plug our pump into the front side of the pond, giving us the best circulation.
Construction Steps
Base Preparation
We will need to prepare two areas of the pond. These areas need to be contoured to allow us to do our installation, and they need to be relatively free of rock, sticks, roots, or anything else that might poke holes in our liner.
On the backside of the pond, we need an area shaped somewhat like a trough that we can place our liner into so that the water will be kept in the liner.
If we are creating a stream, then a slowly meandering trough that starts wherever we would like it to start and ends in the pond would be great. This trough must pitch toward the pond and must not be lower than the top of the pond water at any point.
If we are creating a waterfall, then the hill must be higher, and the trough will look more like steps to allow the water to cascade down the steps. Once again, the waterfall should start at the high spot and end in the pond, but at no time can it be lower than the top of the pond water.
In both of these, the edges of the trough need to be high enough to support the liner so that the water remains in the liner.
The questions of how high the edges need to be and how deep and wide the trough needs to be are always dependent on how much water will be flowing through the stream or waterfall, and this is always dependent on the size of the pump.
Creating an attractive waterfall or stream requires at least 100 gallons per hour of water flow per inch of stream or waterfall width. So, if you want a waterfall that is two feet wide, you need to pump at least 2,400 gallons of water per hour. This is a minimum, and I would suggest more water flow.
Now that the backside of the pond where the stream goes is prepped, we need to prepare the front side of the pond to accept the pump. It is possible to buy a pump that is enclosed in a basket or filter and just toss it into the pond, but this will result in much clogging and much pump maintenance for you, and I assume that you would prefer less maintenance.
Whether your existing pond is lined or unlined will make a big difference in this step. If it is lined, we need to clear the stone, rock, and debris from the liner in the area where the pump will be. If it is unlined, I would recommend installing a piece of liner in the area where you intend to put the pump.
Prepare your pond accordingly. We want to install a culvert section into the pond to house the pump. We will then be covering the culvert with rocks to keep the muck and debris out of our pump.
For right now, clear out muck and debris and make an area that slopes down into the pond from the front edge (near the outlet).
Liner Installation
Once you have your base prepared, you should install the underlayment first. The underlayment is typically a geosynthetic material, but it could be almost anything that will protect the liner from being punctured. The underlayment should be everywhere that liner will come into contact with dirt.
After the underlayment is installed, the liner should be installed over the underlayment and pushed own into the trough. Be sure to always leave plenty of extra liner sticking up over the edges of the trough. Having too much liner is never a problem; we can cut it away at the end. Having too little liner can be the cause of long-term struggles and leaks.
If I am installing streams and waterfalls, I usually buy a roll of rubber that is ten feet wide. This gives me great flexibility in the design and size of the project. Remember that the liner will need to twist and fold to create turns and drops in the stream and waterfall. Also, the larger that your rock is, the wider your stream will need to be, and the wider your rubber will need to be. I’m not suggesting that you need a ten-foot-wide piece of rubber for every size waterfall or stream; I’m just suggesting that you plan to have significantly more than the width of your stream. Figure out what you think you might need, and then add a couple of feet.
Always have several feet of extra liner at the top of the waterfall and at the bottom to ensure that you do not run short.
I understand that rubber liner is expensive, but cutting corners on the amount of liner is the cause of so many problems later in the installation that I just need to stress the importance.
Push underlayment and rubber down into the pump area of the pond also, then place a section of a culvert on top of the rubber and pile rock on top of it until you can no longer see the culvert. Leave the top edge of the culvert exposed just below the top of the water to make it easy to drop the pump down the culvert. Make sure that the bottom of the culvert is protected with stone so that debris cannot get to the pump. Various sizes of stone are best to protect the pump.
Install Rock
Now we can install rock onto the liner of the stream and waterfall. The larger stones should be along the edges for the stream to make it look like a real stream and keep the liner in place. For the waterfall, the larger rocks must also be along the edges but must also be on the steps of the waterfall to create realistic-looking cascades.
At all times, while installing the rock, be sure that the edges of the liner stay standing up and don’t let any folds end up falling down behind the rocks. One fold that settles down behind a rock will be a tricky leak to find. Make it a habit to pull up on the liner after setting each edge rock.
Pay attention to the direction of water flow and the angles of the rocks you set. Don’t set any rocks that will form a ramp that will direct water out of the stream. If you have a rock with a sharp sloping angle on it, just face the angle downstream instead of upstream; this way, the water won’t flow up the ramp and out of your stream or waterfall.
Once all of the edge rocks are set, we can install some rocks in the waterfall area to agitate and direct the water. Once the larger rocks are installed, you can install the river gravel to fill in all gaps.
When installing the rock, you need to think about how the water will flow over and around the rocks, focusing on being sure that the water will not overflow the edge of the rubber and focusing on making the stream or waterfall look as natural as possible.
Install the Pipe
I always use flexible PVC pipe because it is much easier to install than rigid PVC, and it will flex a bit to avoid cracking. The pipe should be installed from the top of the stream or waterfall, around the pond’s edge, and into the culvert area to connect to the pump. I always leave the pipe very shallow, only deep enough to cover the pipe with dirt, mulch, or gravel. The pipe must be pitched toward the pond from the start of the stream or waterfall to the pump. The pipe will be connected to the pump using a PVC fitting. Many pumps come with a fitting.
The size of the pipe used is always dependent on the size of the pump, and more water flow requires a larger pipe. I typically use one-inch pipe for pumps up to 900 gallons per hour(gph), 1.5″ pipe for pumps up to 2000 gph, 2″ pipe for pumps between 2,000 and 7,000 gph, 3″ pipe for pumps that are larger than 7,000 gph, and 4″ for pumps larger than 12,000 gph.
At the top of the waterfall and the start of the stream, create a small bowl in the ground to push the liner down into. Push the pond pipe down to the bottom of this bowl and pile rocks and gravel on top to hold it down. This will allow the water to flow up through the rocks and create a natural-looking beginning to the falls or stream.
Run The Pump
Now is the point when you get your first glance at how the waterfall or stream might look and how the pump filter is working. Plug in the pump and watch the waterfall of stream closely. Since this is your first waterfall or stream, I would anticipate having some areas where the water flows over the edge of the liner. When you see these areas, turn off the pump, push dirt underneath the liner, and then run the pump again. Do this until you have fixed all the places where the water was running out.
At this point, if you think there are no leaks, I would let it run for a few hours and then recheck it looking for any wet areas and keeping an eye on the pond water level. A leak in the stream or waterfall will cause the pond water level to drop quickly.
Add Foam (optional)
Once you are confident that it is not leaking, you can turn it off and use the expanding pond foam to direct the water a bit. Never use the foam to try to keep the water in the liner; only use it to direct the water to go up and over some of the rocks so that you can see the water, rather than having it all run underneath the rocks. Remember, it is only a filler; it is not a water-tight seal, no matter what it says on the can.
I mostly use it under my cascade rocks to seal the bottom of the rock to the liner, and I will also use it to fill the gaps around the edge rocks next to the cascade rock. We are trying to block areas where the water can go under the rocks so that it is forced to go over the rocks.
Adding pond foam is certainly optional. Your pond, waterfall, and stream will function perfectly without any foam. The foam is only there for us to push the water up and over the rocks where we can see it better.
When working with the pond foam, wear rubber gloves, and please use it sparingly. It expands quite a bit and is sticky and very hard to remove from your hands.
After you have applied the pond foam and it is starting to dry, it may be a good idea to toss some gravel on the top of some of the larger foam areas so that it will stick and disguise the foam. This needs to be done before it finishes drying but after it sets for a little bit. Also, before it becomes completely dry and hard, you can push the expanding areas back into place to avoid having as much to clean away later. Always use caution when pushing on the foam; you want it to form a good seal between the rubber and the rock
Let the pond foam dry for a few hours and then push down or pull away any excess foam and disguise it with gravel.
Now, try to run the pump again. You will likely have raised the water level in the waterfall or stream, so you will probably have new leaks that you didn’t have before. Turn the pump off, push more dirt under the liner to stop the leaks, and then let it run once you think it is no longer leaking.
I would now let it run for a day and once again look for leaks.
Trim and Cover
Once you have the waterfall or stream running, you like how it looks and doesn’t leak; you can cut away the excess rubber. I typically leave at least 4″ of excess rubber along all edges and then let it run again. If it doesn’t leak, fold this excess rubber under or cover it with gravel, and you are done. Take a bit of extra time and be sure that all voids between rocks are filled with gravel. This will keep the mice out of your waterfall. Mice like to make nests in a hole over the winter, and they will chew holes in your rubber in the process.
Now you have a beautiful waterfall or stream in your yard, and I’ll be that you have some great ideas on how you would do it differently if you ever do it again. Who knows, you may just decide to do it again someday.
General Waterfall and Stream Tips
- The balance of your pond relies on water movement, aeration, bacteria, and plants. The water movement and aeration provide oxygen for the plants, fish, and bacteria. The bacteria help break down debris that gets into the pond, and the plants take nutrients out of the water. The more attractive aquatic plants we have in our ponds, the fewer nutrients available for algae to grow. Now that you have a stream or waterfall, you have a great spot to install some aquatic plants. Put them on top of the rubber and under the river gravel without any pot. The roots will spread, and the plant will help to keep your pond clean.
- Cleaning and maintenance of your waterfall or stream should be minimal. Most of the debris that gets into the stream or waterfall will end up in the pond. If you have a lined pond, you may want to pump it down and pressure wash everything every few years, but it is not entirely necessary. Cleaning helps to prevent large deposits of muck on the pond bottom. The stream and waterfall will almost certainly grow algae. Don’t panic; this is natural. Rather than spending time trying to scrub algae off of the rocks, which doesn’t work anyway, you should plant more plants and figure out how to keep excess nutrients out of your water.
- Don’t ever fertilize the lawn around your pond; this will undoubtedly cause some fertilizer to run into your pond the next time it rains, which will be sure to grow a bunch of algae.
- If you see a leak in your pond, it is almost always a stream or waterfall edge that has settled or fallen down. One way to tell if it is your stream or waterfall that is leaking or if it is your pond is to turn off the pump. If the water level keeps going down with the pump off, then your pond is leaking. If the pond is no longer losing water with the pump off, the leak is in the stream or waterfall.
- If you do get rodent holes or tears in your liner, don’t worry, they can be patched. Just about every sort of pond liner has patch kits available. If you use rubber liner, it is just like patching a bike inner tube.
- Add some low volt lighting to liven up your new waterfall or stream. Lights will give you a good show when the sun goes down. You can use waterproof lights under the water, which will make the water glow and shimmer, or you can use lights out of the water, which will give you a brighter, more sparkly shine. You can decide which one you like better.
- Don’t resort to chemically treating your pond. By using chemicals, you are throwing the pond out of balance because you are killing off vital parts of the ecosystem. Only use completely natural bacteria to add to the pond. Using chemicals, even if the container says it is fish and plant safe, is killing microorganisms and algae. These dead materials sink to the bottom of your pond and add to the nutrients making your problems worse.